|
|
|
Porsche, and the Porsche crest are registered trademarks of Dr. Ing. h.c. F. Porsche AG.
This site is not affiliated with Porsche in any way. Its only purpose is to provide an online forum for car enthusiasts. All other trademarks are property of their respective owners. |
|
|

  |

| PaIsa |
 Jan 7 2025, 06:19 PM Jan 7 2025, 06:19 PM
Post
#1
|
|
Member  Group: Members Posts: 104 Joined: 13-June 24 From: Quebec, Canada Member No.: 28,180 Region Association: Canada |
Long story short, 2 of the 3 bolts holding the left rear trailing arm broke on me. One broke and left some of the bolt out of the hole so I thought I could get it with heat and vise grip but nope. She is stuck. The other one broke and what is left is in the hole.
I cannot believe I am the first 914 owner dealing with this. As I said, for the bolt that left me something to work with my plan was to heat it and use vise grip to try to get it. Tried on multiple occasion but she does not want to come out. For the other one I guess I only have left to dril it out and try to redo the threads hoping for the best. Does anyone has any other advice or method to try. I do not have a welding machine so welding a nut is not an option for now and not sure it would work (for the one that sticks out of the hole). I am open for any advice. I plan to work on this with my son this weekend. Thanks 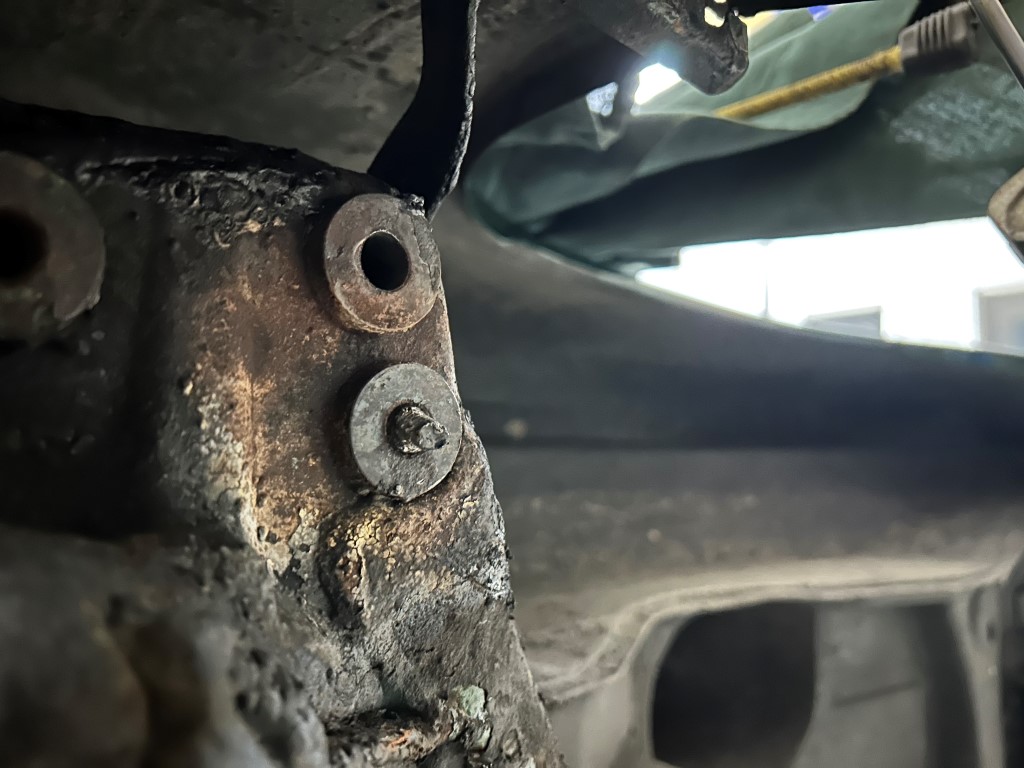 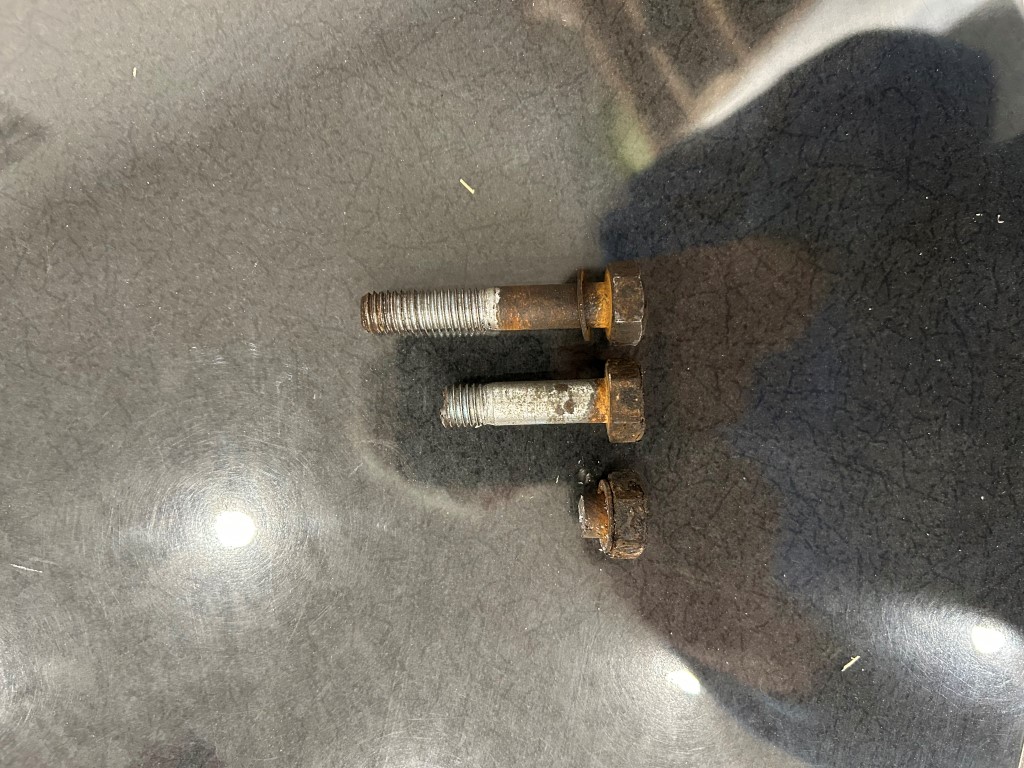 |
   |

 
|
| technicalninja |
Jan 7 2025, 06:39 PM
Post
#2
|
|
Advanced Member Group: Members Posts: 2,456 Joined: 31-January 23 From: Granbury Texas Member No.: 27,135 Region Association: Southwest Region |
Those bolts go all the way through the body and have plastic plugs sealing the other end.
If you look on the top side of the suspension console you can find the plugs, they may be covered in undercoating. Pull them out and you will see the threaded section. I use "pimp juice" on rusted ferrous parts. Works better than anything I've ever bought! 1/2 acetone (nail polish remover) and 1/2 DEXIII atf. I use the old stuff over DEXVI. Soak bolts... Sometimes I've had the pimp juice "Free up" completely locked up junk. I have a set of left-handed cobalt drill bits that I would use next to drill out centers of bolts (the buried one). Sometimes the drill itself extracts the bolt. The one that is still sticking out I'd clamp VGs on and work bolt back and forth a tiny bit until I saw movement. If you can break it lose you WON! Worst case I'd carefully use a torch to heat up the threaded insert. Heating from the bolt side (with torch) won't work. They do have "inductive" bolt heaters that MIGHT work on the one exposed. I have not used one yet but they can apply the heat specifically to the bolt and heat up the stuck portion enough to make a difference. The internal broke off one would be the one I'd expect trouble out of |
|
|
|
| technicalninja |
Jan 7 2025, 07:00 PM
Post
#3
|
|
Advanced Member Group: Members Posts: 2,456 Joined: 31-January 23 From: Granbury Texas Member No.: 27,135 Region Association: Southwest Region |
It's possible to catch the undercoat on fire, be careful.
The pimp juice needs to be shaken often. I've found the best container is a 100ml vape juice bottle. Keep the little tube end. This stuff is bigtime runny. Don't get pimp juice on anything that the acetone can eat. The ATF just makes the damage worse. I've watched pimp juice CLIMB an 8mm bolt 1/2" up. I 'pre' juice anything I want to take apart on anything over 20 years old... |
|
|
|
| Superhawk996 |
Jan 7 2025, 07:46 PM
Post
#4
|
|
914 Guru Group: Members Posts: 6,813 Joined: 25-August 18 From: Woods of N. Idaho Member No.: 22,428 Region Association: Galt's Gulch |
You are so (IMG:style_emoticons/default/sheeplove.gif) especially on those that broke off inside the bobbin. I don’t envy you. May God give you lots of courage and patience.
Ninja’s suggestions are solid. Start soaking the fasteners today! Personally I’d consider hiring someone with a welder to deal with the exposed one. On the ones broken off under flush - I’d find or fabricate a drill guide to keep any drilling with left hand drill bits centered. I would also pre-grind the underflush fastener as flat as I could get it to prevent the drill tip from waking off center on a jagged - fractured bolt. Regardless of what happens . . . For the love of God, don’t try to use a bolt extractor I had one of these come to me pre-broken and with a broken off EZ out in the bolt when I bought my car. I ended up replacing the bobbin during a compete restoration surgery. Details in my build thread if you want a view to the internals of what you’re dealing with. Page 3, post #46. Link to my build in my signature. I dread thinking about doing this on car & upside down. The saving grace is that Tangerine Racing sells the bobbins if it all goes to (IMG:style_emoticons/default/stromberg.gif) They are weld in and a whole project unto itself . . . But at least they are available vs having to fabricate them from scratch. Give it your best and if you need clarification on how to make the drill guide, etc. just ask for more clarification. |
|
|
|
| r_towle |
Jan 7 2025, 08:28 PM
Post
#5
|
|
Custom Member Group: Members Posts: 24,705 Joined: 9-January 03 From: Taxachusetts Member No.: 124 Region Association: North East States |
I remember @chris foley @tangerine racing used to sell replacement threaded tubes for the specific condition.
Not sure if he still has some, but I looked on his website and did not see them. Pretty simple, a hole saw top and bottom to remove the old ones and the weld in the new ones, which are a larger outer diameter |
|
|
|
| JamesM |
Jan 7 2025, 08:29 PM
Post
#6
|
|
Advanced Member Group: Members Posts: 2,049 Joined: 6-April 06 From: Kearns, UT Member No.: 5,834 Region Association: Intermountain Region |
QUOTE(Superhawk996 @ Jan 7 2025, 06:46 PM)  You are so (IMG:style_emoticons/default/sheeplove.gif) especially on those that broke off inside the bobbin. I don’t envy you. May God give you lots of courage and patience. Quit scaring him, its not that bad! (IMG:style_emoticons/default/tongue.gif) Annoying yes, end of the world, no. Im sure he has much bigger issues with his car, he just doesn't know about them yet. Pretty much what everyone else said though, soak the crap out of it, get a stud extraction kit and attempt to drill/extract. This can potentially be done from above or below. Worst case you totally destroy the threads the cylindrical threaded sleeve is just held in with a few welds and can be replaced. Tangerine used to sell these new, not sure if they still do. Even if you destroy just some of the threads its fully threaded longer than the bolt so you can get a slightly longer bolt to grab more threads. Once you get the bolts out though chase all the threads with a tap and get new bolts, those all look pretty hammered. |
|
|
|
| Superhawk996 |
Jan 7 2025, 08:37 PM
Post
#7
|
|
914 Guru Group: Members Posts: 6,813 Joined: 25-August 18 From: Woods of N. Idaho Member No.: 22,428 Region Association: Galt's Gulch |
QUOTE(JamesM @ Jan 7 2025, 10:29 PM) QUOTE(Superhawk996 @ Jan 7 2025, 06:46 PM) You are so (IMG:style_emoticons/default/sheeplove.gif) especially on those that broke off inside the bobbin. I don’t envy you. May God give you lots of courage and patience. Im sure he has much bigger issues with his car, he just doesn't know about them yet. (IMG:style_emoticons/default/av-943.gif) imma’ gonna’ steal that line someday. You are right - not the end of the world just a giant PITA. Bring the patience. I think Ninja already pointed this out but let me reiterate - the threads are at the top of the bobbins - that is where you want the heat to expand and loosen the threads. Focusing the heat on the bottom where the bolt head is will be less important. |
|
|
|
| PaIsa |
Jan 8 2025, 06:02 AM
Post
#8
|
|
Member Group: Members Posts: 104 Joined: 13-June 24 From: Quebec, Canada Member No.: 28,180 Region Association: Canada |
One thing that I am unsure of is the fact that these 2 ''bobins'' are open from bottom to top. I just verified on the passenger side and the bobin in the front, I can get through with a punch (or anything else for that matter) but the 2 at the back, I can't. Tried from the top or bottom. There seems to be some metal plate in there. Not a big problem, I can drill through, but I guess it could be the same on the driver side where I have my problem.
|
|
|
|
| 930cabman |
Jan 8 2025, 11:54 AM
Post
#9
|
|
Advanced Member Group: Members Posts: 3,966 Joined: 12-November 20 From: Buffalo Member No.: 24,877 Region Association: North East States |
sorry, this is not an easy fix and has been mentioned do not attempt an ez out, Surely it will snap off.
its a long shot, but EDM |
|
|
|
| ChrisFoley |
Jan 8 2025, 12:28 PM
Post
#10
|
|
I am Tangerine Racing Group: Members Posts: 7,978 Joined: 29-January 03 From: Bolton, CT Member No.: 209 Region Association: None |
I successfully drilled out 3 of 6 on a car in my shop, just last month.
It is one of the worst repair jobs on a 914. Saving the threads is important because the next level of repair involves replacing the heavy steel sleeve that the bolts thread into. I used to sell replacement sleeves. |
|
|
|
| 914werke |
Jan 8 2025, 12:33 PM
Post
#11
|
|
"I got blisters on me fingers" Group: Members Posts: 11,134 Joined: 22-March 03 From: USofA Member No.: 453 Region Association: Pacific Northwest |
QUOTE(PaIsa @ Jan 8 2025, 04:02 AM) One thing that I am unsure of is the fact that these 2 ''bobins'' are open from bottom to top. Depends on the MY of the car. Early cars DID in fact use caps, later cars the holes at top were either welded or brazed closed. (IMG:style_emoticons/default/idea.gif) |
|
|
|
| Superhawk996 |
Jan 8 2025, 12:39 PM
Post
#12
|
|
914 Guru Group: Members Posts: 6,813 Joined: 25-August 18 From: Woods of N. Idaho Member No.: 22,428 Region Association: Galt's Gulch |
QUOTE(ChrisFoley @ Jan 8 2025, 02:28 PM) I used to sell replacement sleeves. What do you mean - used to? (IMG:style_emoticons/default/new_shocked.gif) Those bobbins were lifesavers vs having to machine from scratch. But ya I get it - probably don’t move many per year and not a money maker Oh man, being able to buy one from you was a real timesaver for me back around 2018 or so! |
|
|
|
| technicalninja |
Jan 8 2025, 12:41 PM
Post
#13
|
|
Advanced Member Group: Members Posts: 2,456 Joined: 31-January 23 From: Granbury Texas Member No.: 27,135 Region Association: Southwest Region |
I've got a 31K mile 75 that definitely had the plastic caps.
I ripped those critters out and pimped juiced my stuff for a week before I tried to turn. All fasteners came out nice enough to re-use! |
|
|
|
| rudedude |
Jan 8 2025, 12:43 PM
Post
#14
|
|
Senior Member Group: Members Posts: 520 Joined: 1-January 05 From: minneapolis, mn Member No.: 3,387 Region Association: Upper MidWest |
All three are open from above with the plastic caps on them. If it was me I and there were any threads left in deep broken I would make a drill guide from a bolt to center your first drilling with your new left hand cobalt drill, not the harbor freight variety, and then sequentially drill with the other new left drills you buy until judt the threads are left. Then pick those out and carefully retap. The other you probably will have to grind flat and drill, I dont see enough material to grab. But as others have said soaking is your friend, I use free all but sure smells like acetone and atf. It can be done.
|
|
|
|
| PaIsa |
Jan 8 2025, 12:51 PM
Post
#15
|
|
Member Group: Members Posts: 104 Joined: 13-June 24 From: Quebec, Canada Member No.: 28,180 Region Association: Canada |
QUOTE(914werke @ Jan 8 2025, 01:33 PM) QUOTE(PaIsa @ Jan 8 2025, 04:02 AM) One thing that I am unsure of is the fact that these 2 ''bobins'' are open from bottom to top. Depends on the MY of the car. Early cars DID in fact use caps, later cars the holes at top were either welded or brazed closed. (IMG:style_emoticons/default/idea.gif) Mine seem to be capped like 1/2 to 3/4'' from the top. As I said, not a big problem as if needed, I could drill through. In the case the thread get trashed, does going to a larger bolt could be an option. The sleeve (bobbin) seems beefy enough to accept a larger bolt. I guess it would mean increasing the size of hte holes on the trailing arm console. Does anyone see any problem to this last resort option, before having to replace the sleeves. One other option I see would be to have long bolts going thought the sleeve and putting a nut on top of the sleeve. |
|
|
|
| Superhawk996 |
Jan 8 2025, 01:37 PM
Post
#16
|
|
914 Guru Group: Members Posts: 6,813 Joined: 25-August 18 From: Woods of N. Idaho Member No.: 22,428 Region Association: Galt's Gulch |
QUOTE(PaIsa @ Jan 8 2025, 02:51 PM) Mine seem to be capped like 1/2 to 3/4'' from the top. As I said, not a big problem as if needed, I could drill through. My bet is the caps were removed / lost and the holes at top left open. Dirt and corrosion then sits on top of the bolt forming a plug. I’ve seen that before. Again, start soaking with penetrating oil, pimp juice or whatever. Fill the hole - let it sit. Rinse lather repeat. Do this for days in advance. Then see if you can begin to remove it - break it - drill it - chisel it once it softens up. The other less likely option is someone broke the bolt in there previously and left it. Maybe was only grabbing a few of the lower remaining threads with a new bolt threaded in below the broken portion. (IMG:style_emoticons/default/confused24.gif) As always - start least destructive and work your way to more aggressive methods. Do Not use an EZ out - once that hardened piece of tool steel breaks in a bobbin you’re absolutely screwed with EDM being the only method to remove hardened tool steel. And by the way - practically impossible to EDM on vehicle; even harder to EDM on car and upside down. Don’t reach for the EZ out, just don’t. |
|
|
|
| Ishley |
Jan 8 2025, 01:47 PM
Post
#17
|
|
Member Group: Members Posts: 198 Joined: 4-October 21 From: Clarendon Hills Il Member No.: 25,957 Region Association: Upper MidWest |
You might consider just getting the threaded bobbins from Tangerine racing. Cutting the old ones out and welding in new ones could be faster. I spent a ton of time trying to get the broken bolts out. I wish I had just changed them. I know you said you don’t weld.. so that is part of the issue. Hopefully you get it worked out.
|
|
|
|
| ChrisFoley |
Jan 8 2025, 01:59 PM
Post
#18
|
|
I am Tangerine Racing Group: Members Posts: 7,978 Joined: 29-January 03 From: Bolton, CT Member No.: 209 Region Association: None |
QUOTE(Superhawk996 @ Jan 8 2025, 01:39 PM) The small quantity I have remaining is reserved in case anyone buys one of my raised suspension kits. (IMG:style_emoticons/default/smile.gif) |
|
|
|
| ChrisFoley |
Jan 8 2025, 02:12 PM
Post
#19
|
|
I am Tangerine Racing Group: Members Posts: 7,978 Joined: 29-January 03 From: Bolton, CT Member No.: 209 Region Association: None |
QUOTE(PaIsa @ Jan 8 2025, 01:51 PM) QUOTE(914werke @ Jan 8 2025, 01:33 PM) QUOTE(PaIsa @ Jan 8 2025, 04:02 AM) One thing that I am unsure of is the fact that these 2 ''bobins'' are open from bottom to top. Depends on the MY of the car. Early cars DID in fact use caps, later cars the holes at top were either welded or brazed closed. (IMG:style_emoticons/default/idea.gif) Mine seem to be capped like 1/2 to 3/4'' from the top. As I said, not a big problem as if needed, I could drill through. In the case the thread get trashed, does going to a larger bolt could be an option. The sleeve (bobbin) seems beefy enough to accept a larger bolt. I guess it would mean increasing the size of hte holes on the trailing arm console. Does anyone see any problem to this last resort option, before having to replace the sleeves. One other option I see would be to have long bolts going thought the sleeve and putting a nut on top of the sleeve. I've seen plenty of cars repaired by drilling out the threads and using longer thru bolts. I don't like it but it is a whole lot easier than replacing the sleeve. A potential problem with using larger diameter bolts is that they may limit the toe adjustment range.; |
|
|
|
| PaIsa |
Jan 10 2025, 06:46 PM
Post
#20
|
|
Member Group: Members Posts: 104 Joined: 13-June 24 From: Quebec, Canada Member No.: 28,180 Region Association: Canada |
So my son and I were able to deal with the buried with. We drilled it from top and bottom but the 2 holes we created are not aligned so the M10x1.5 thread are no longer usable.
The option we selected was to make new threads (M12x1.75) at the bottom of the bobbin and we will use larger bolt to attach the console. As ChrisFoley pointed out this may limit the range for toe adjustment, but will see. Tomorrow, we will start to deal with the other one. |
|
|
|
|
2 User(s) are reading this topic (2 Guests and 0 Anonymous Users)
0 Members:

|
Lo-Fi Version | Time is now: 12th March 2025 - 05:21 AM |
Invision Power Board
v9.1.4 © 2025 IPS, Inc.