|
|
|
Porsche, and the Porsche crest are registered trademarks of Dr. Ing. h.c. F. Porsche AG.
This site is not affiliated with Porsche in any way. Its only purpose is to provide an online forum for car enthusiasts. All other trademarks are property of their respective owners. |
|
|

  |

| Montreal914 |
 Oct 24 2020, 05:59 PM Oct 24 2020, 05:59 PM
Post
#1
|
|
Senior Member  Group: Members Posts: 1,818 Joined: 8-August 10 From: Claremont, CA Member No.: 12,023 Region Association: Southern California |
Edit: I might as well make this my rebuild thread...
Original post; I got side tracked on my Microsquirt build as I have decided, after 11 years of ownership, to finally get my car painted to get her ready for her upcoming 50th birthday. (IMG:style_emoticons/default/smile.gif) Knowing these endeavors can take a lot more time than initially planned, I hope to make it in time... (IMG:style_emoticons/default/wacko.gif) Originally bahia red 73 1.7. The goal is a narrow body 2056 Microsquirt, VW Tornado red, 5 lugs conversion with 16" Fuchs. Front: 914-4 A arms with rubber bushings, 911 3" pin struts, Bilstein inserts, Alfa Brembo, vented rotor, stock torsion bar, 19mm sway bar, turbo tie rods, and 19mm master cylinder. Rear: Drilled hubs, But before I get the pleasure of installing all of these beautiful fresh goodies, I need to tackle the not so fun stuff... (IMG:style_emoticons/default/headbang.gif) I have already started fixing some of the rust issues and will share that progress in the near future but right now, I wanted to post some of the issues i have on the passenger side front fender. (IMG:style_emoticons/default/sad.gif) I have searched and read many of the builds here but I would like some inputs from the people who have gone through this mess. I am trying to understand the construction of the rear part of the fender, more precisely the area joining the front cowling. Below is a sketch of how I think it is made but i would like someone to confirm... 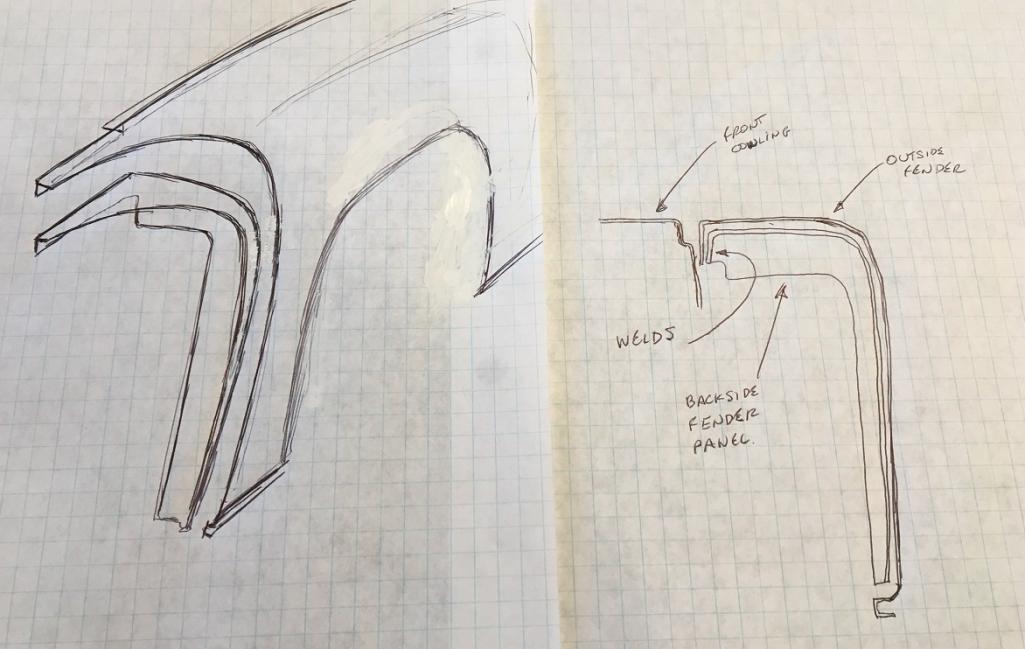 Having removed the seam sealer in the upper rear area, I have discovered "this" (IMG:style_emoticons/default/dry.gif) which is not really unusual, but clearly a pain to fix. I am not sure though what I am looking at. If my sketch is correct, I guess the inner rusted layer is from the fender rear bulkhead that actually becomes an inner layer on the rear upper point of the fender by the door and cowling junction. 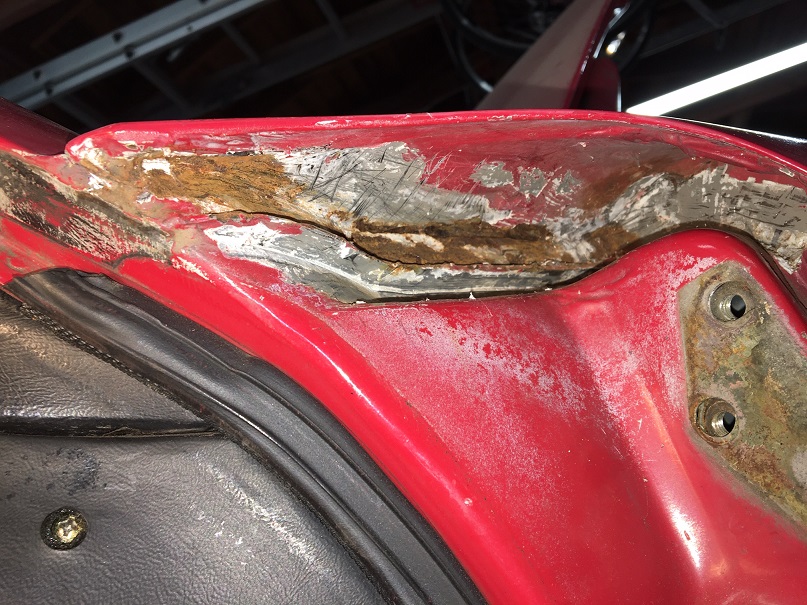 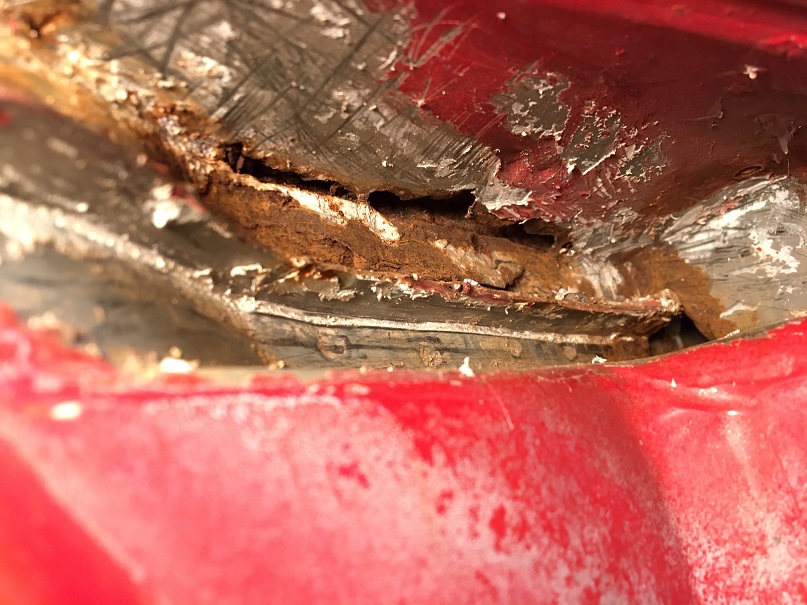 I might be able to cut this from the underside preventing me from cutting the outer surface of the fender. But I would like to better understand what is happening at the junction to the body. How many layers are there from the fender, one or two? Is the metal peeling off at the joint to the body the metal from the bulkhead/inner layer, or is it the outer fender layer? As a reference, this if the situation of the channel, surface rust, but how bad? Is there a way to better know without destroying? Maybe poke with a screwdriver? (IMG:style_emoticons/default/confused24.gif) 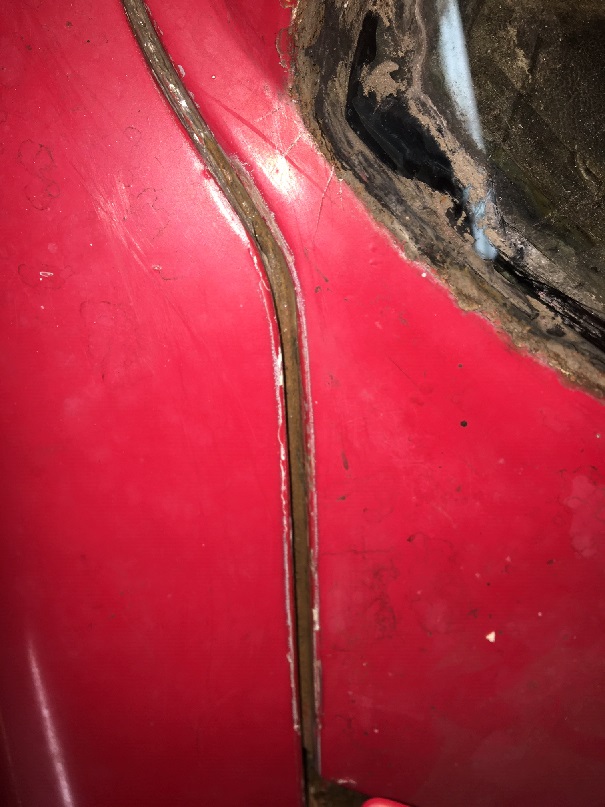 Comments appreciated (IMG:style_emoticons/default/smile.gif) |
   |

 
|
| cary |
Oct 24 2020, 06:32 PM
Post
#2
|
|
Advanced Member Group: Members Posts: 3,900 Joined: 26-January 04 From: Sherwood Oregon Member No.: 1,608 Region Association: Pacific Northwest |
|
|
|
|
| horizontally-opposed |
Oct 24 2020, 06:33 PM
Post
#3
|
|
Advanced Member Group: Members Posts: 3,456 Joined: 12-May 04 From: San Francisco Member No.: 2,058 Region Association: None |
All I can say is…go the distance in that area.
A good metalworker thought he had it—but we had to repaint that side of the car. That was after another good metalworker opened up a window in that spot to "really fix it." Well, there's something going on under the paint again. It's minor, but we all know what it means… (IMG:style_emoticons/default/barf.gif) If I ever go in there again, I'd really look at not only eradicating all rust with new metal, but what might be done about keeping water out and help find a good drain path for any future moisture that does manage to get into that area. |
|
|
|
| Montreal914 |
Oct 24 2020, 07:37 PM
Post
#4
|
|
Senior Member Group: Members Posts: 1,818 Joined: 8-August 10 From: Claremont, CA Member No.: 12,023 Region Association: Southern California |
@cary
Thank you for the links, this is very informative. I wish I had a super in law! (IMG:style_emoticons/default/smilie_pokal.gif) This ought to be interesting and definitely challenging. @horizontally-opposed Pete you car has been my inspiration since the first time I saw it parked by the fence at Luftgekült in Long Beach, not knowing it was yours. I was amazed how good the Bahia red could look, compared to my burned and faded one. Immediately after, I inquired here about the nice red car parked by the fence, and found the whole story. It was settled, VW Tornado Red, it was going to be. (IMG:style_emoticons/default/smile.gif) |
|
|
|
| cary |
Oct 25 2020, 09:48 AM
Post
#5
|
|
Advanced Member Group: Members Posts: 3,900 Joined: 26-January 04 From: Sherwood Oregon Member No.: 1,608 Region Association: Pacific Northwest |
I'm going to ask George (AA) and Alex and Pete at RD about making another patch panel. George made the cowl piece, we need the fender section too.
I think I've done 4. I bought a complete hinge post with fender support and harvested the inner piece. But it would be nice to use new metal. Sitting here thinking if I was to do it again and bought another hinge post I'd take it and have it dipped. |
|
|
|
| Montreal914 |
Oct 25 2020, 03:37 PM
Post
#6
|
|
Senior Member Group: Members Posts: 1,818 Joined: 8-August 10 From: Claremont, CA Member No.: 12,023 Region Association: Southern California |
Today's update. After carefully studying Cary's pictures (IMG:style_emoticons/default/smilie_pokal.gif) I dove in (IMG:style_emoticons/default/sawzall-smiley.gif)
No big surprises here. 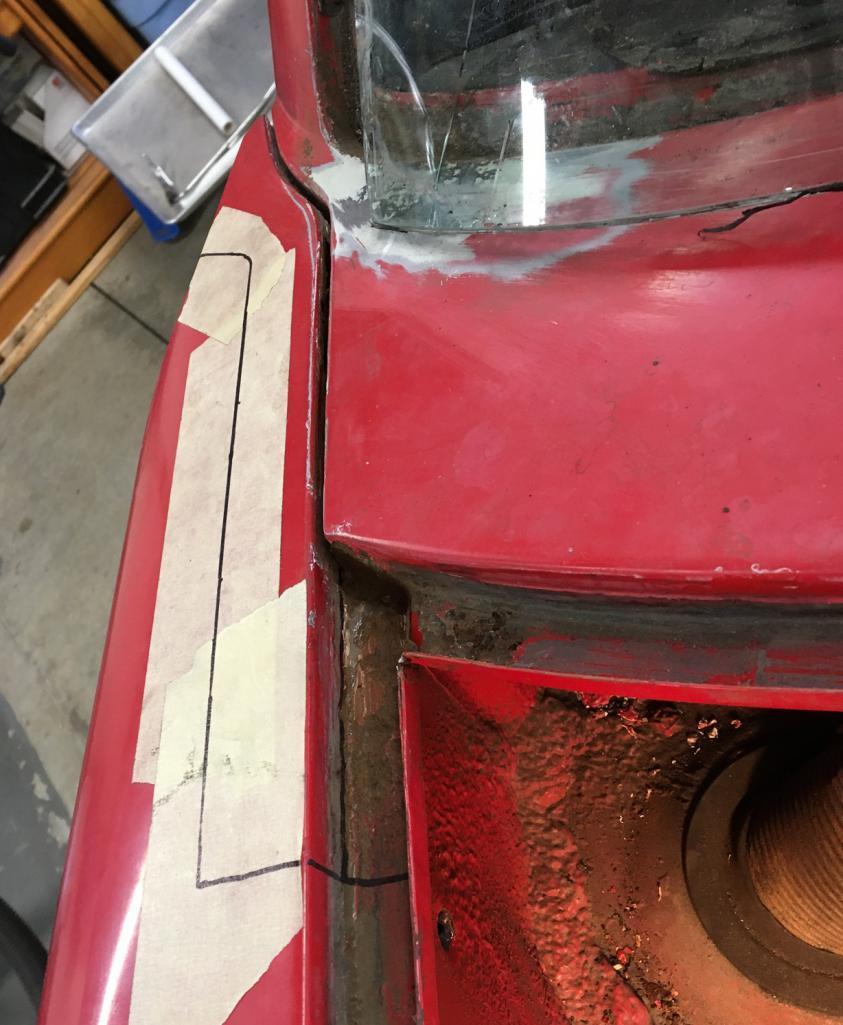 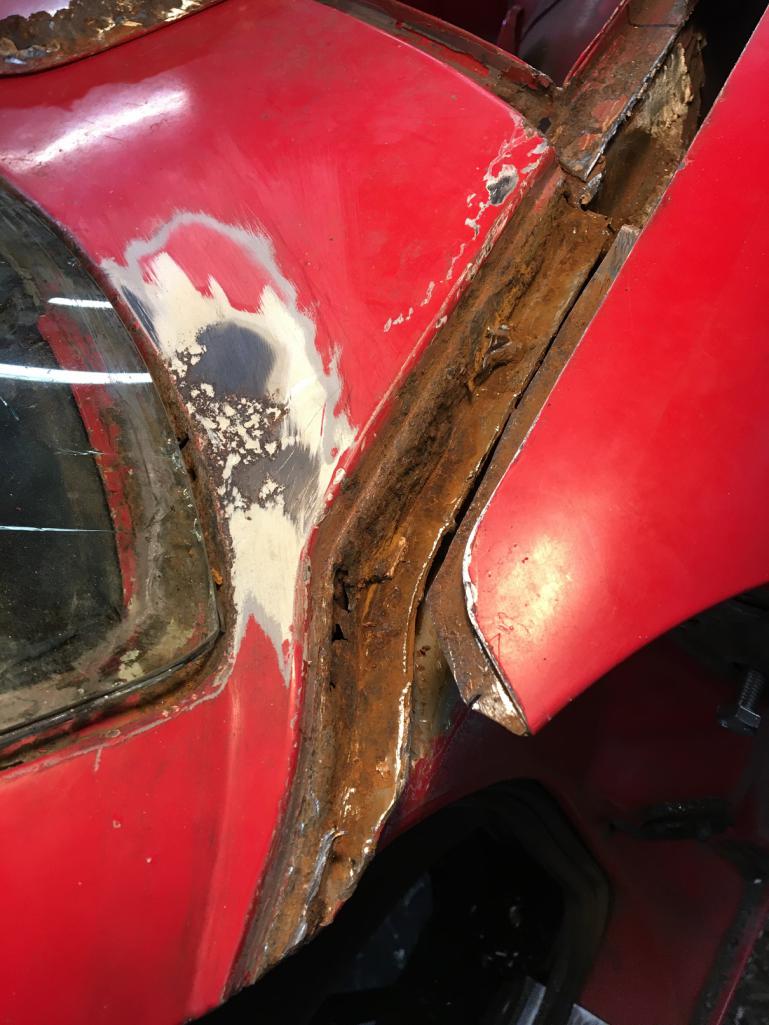  At his point the cowl corner needs to be addressed at the fender junction, at the front trunk seal, and under the windshield area. I think my best bet is to get both or these replacement parts as a foundation for the repair. Any comments one the fit of these?   |
|
|
|
| cary |
Oct 25 2020, 04:28 PM
Post
#7
|
|
Advanced Member Group: Members Posts: 3,900 Joined: 26-January 04 From: Sherwood Oregon Member No.: 1,608 Region Association: Pacific Northwest |
Looks good. Full speed ahead.
I didn't know George even made that piece. Not in Body Sheet Metal section. I'll do some digging. Lionel has it in their Ebay store. |
|
|
|
| Montreal914 |
Oct 25 2020, 04:34 PM
Post
#8
|
|
Senior Member Group: Members Posts: 1,818 Joined: 8-August 10 From: Claremont, CA Member No.: 12,023 Region Association: Southern California |
On AA website:
Part number: 91450303211A and 914503057R Question is should I put a few patches taken from the repair piece or cut a lot of the car to fit the repair piece as a whole... (IMG:style_emoticons/default/idea.gif) There is still a lot of good metal on the car in that area. I fear going into the A pillar. (IMG:style_emoticons/default/sad.gif) |
|
|
|
| cary |
Oct 25 2020, 05:17 PM
Post
#9
|
|
Advanced Member Group: Members Posts: 3,900 Joined: 26-January 04 From: Sherwood Oregon Member No.: 1,608 Region Association: Pacific Northwest |
Only cut out what you need too on either piece .............
Next big issue is making sure you have the correct gap between the 2 pieces, so the cowl trim strip fits correctly. On Doug's I had about 10mm ( don't know where that came from, we were about 1mm too tight ) that was too tight. But we made our own pieces by hand. http://www.autoatlanta.com/results.php?par...r=914%201970-76 Only one piece correctly categorized. I'm going to buy one of each of the fender portions. Already have a pair of the cowl sections. |
|
|
|
| Montreal914 |
Oct 25 2020, 06:10 PM
Post
#10
|
|
Senior Member Group: Members Posts: 1,818 Joined: 8-August 10 From: Claremont, CA Member No.: 12,023 Region Association: Southern California |
Yes, it's all about the gap and its evenness throughout its whole length. From the driver's side, it looks like ~3.2mm, which happens to be spot on 1/8" flats.
Will contact AA tomorrow and place an order. Thank you, will cut only the bad stuff and patch using what is required from new panels. (IMG:style_emoticons/default/beerchug.gif) 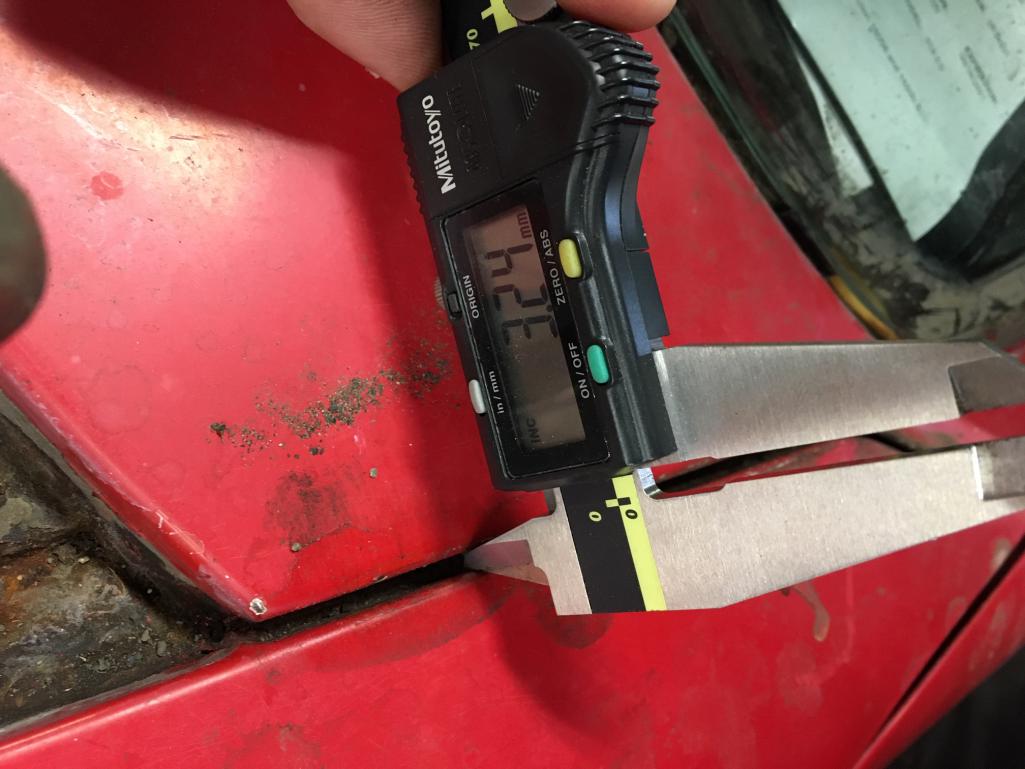 |
|
|
|
| Montreal914 |
Oct 27 2020, 07:32 PM
Post
#11
|
|
Senior Member Group: Members Posts: 1,818 Joined: 8-August 10 From: Claremont, CA Member No.: 12,023 Region Association: Southern California |
I worked a couple of hours last night and began to look for solid metal at the junction of the fender with the cowl.
This is after a cut below the fold of the cowl. If I need to go above it I will, but I would rather weld-in the new piece in this hidden area. 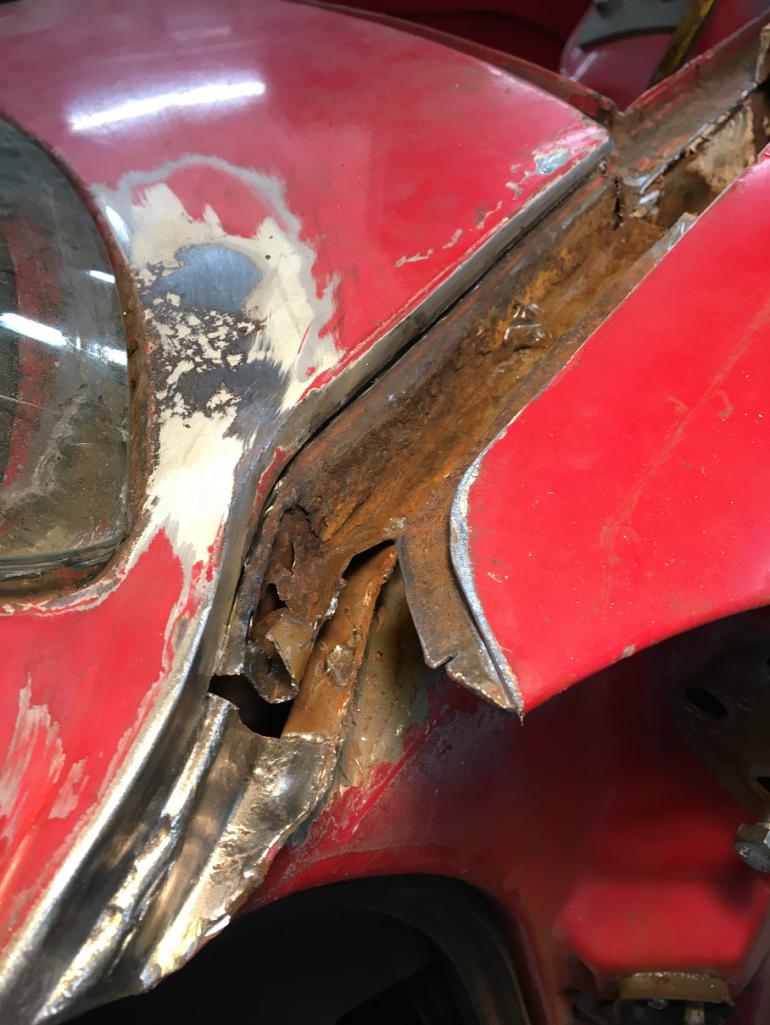 After the rusted metal was removed, I now have a decent shelf for the new piece to rest on and a nice clean metal in the vertical section of the cowl joint to the fender. Obviously, there will be more prepping before reconstruction. 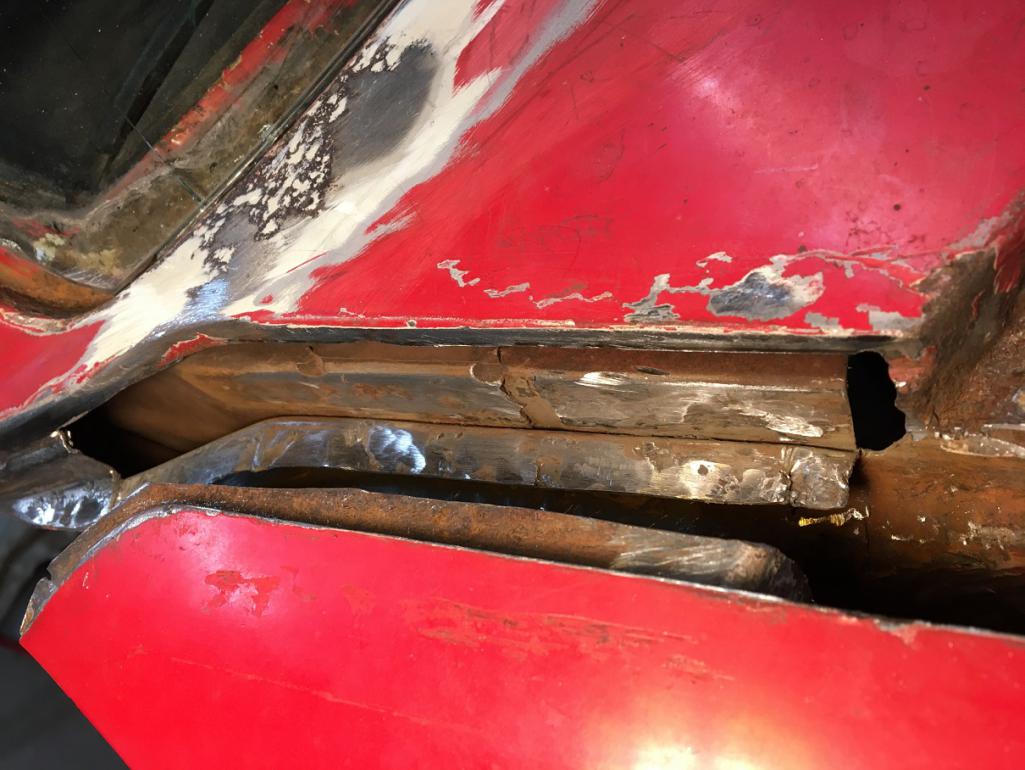 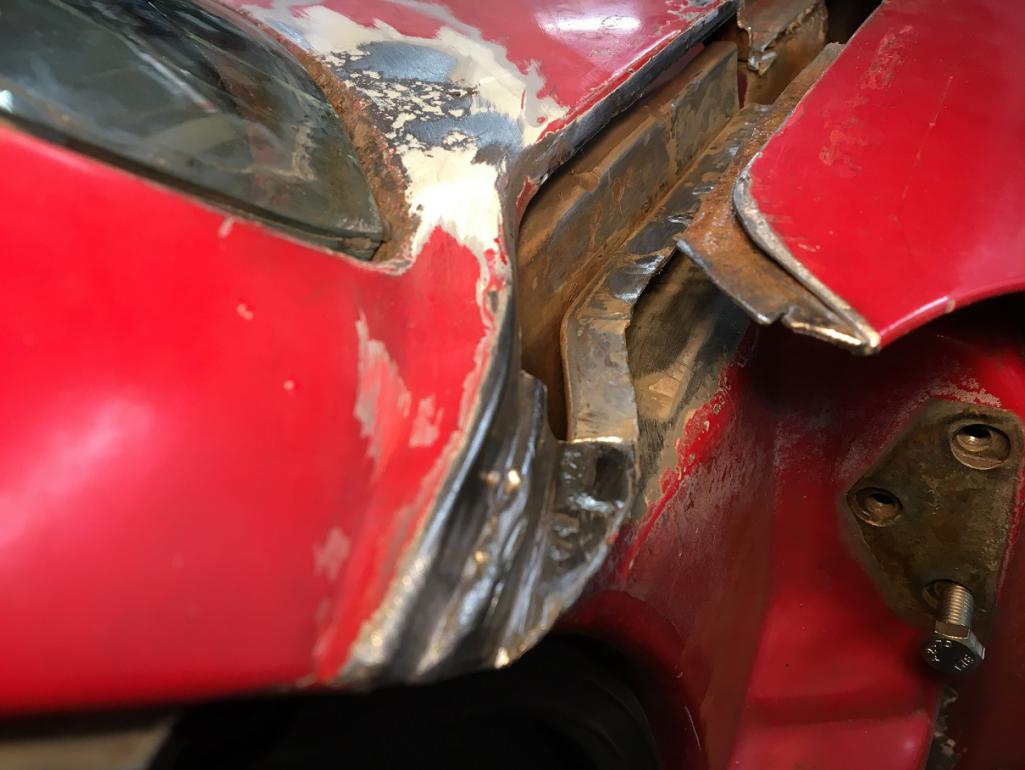 |
|
|
|
| Montreal914 |
Oct 27 2020, 10:33 PM
Post
#12
|
|
Senior Member Group: Members Posts: 1,818 Joined: 8-August 10 From: Claremont, CA Member No.: 12,023 Region Association: Southern California |
A little more cleaning up tonight. Looking at the situation I am considering 2 options (IMG:style_emoticons/default/idea.gif) but which one would be the best... (IMG:style_emoticons/default/confused24.gif)
@cary I really value your advice. What would you recommend? Cutting across per dashed line, or a patch work? For the patching option, the trunk seal area would get cut out the same way as the fender to cowl to hide the weld. In the windshield area I have to go on the finished surface (IMG:style_emoticons/default/sad.gif) , unless I Ospho the surface and do the cut in an area where the windshield trim will hide the welds, but that seems like a half job since I am already way deep in this. (IMG:style_emoticons/default/sad.gif) Comments appreciated (IMG:style_emoticons/default/beerchug.gif) 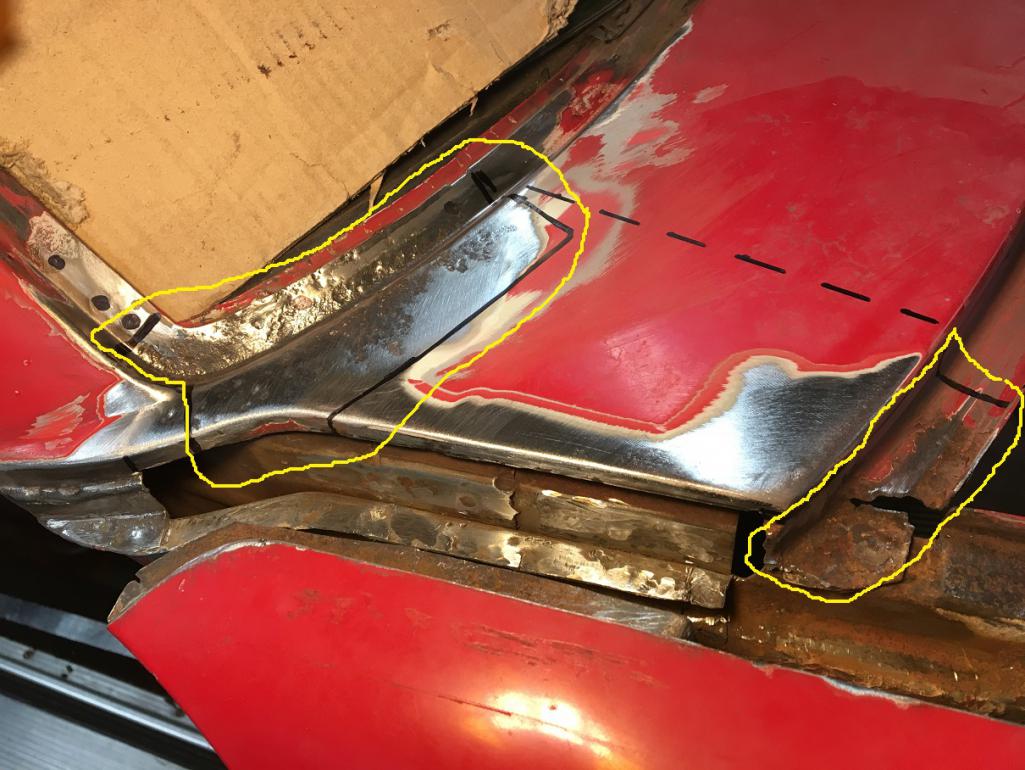  |
|
|
|
| Arno914 |
Oct 28 2020, 03:03 AM
Post
#13
|
|
Member Group: Members Posts: 233 Joined: 13-May 20 From: near Frankfurt, Germany Member No.: 24,260 Region Association: Germany |
Hi,
here are pics of a NOS Fender I aquired a long time ago. Maybe that helps to understand the construction. Greetings, Arno (IMG:http://www.914world.com/bbs2/uploads_offsite/up.picr.de-24260-1603875790.1.jpg) (IMG:http://www.914world.com/bbs2/uploads_offsite/up.picr.de-24260-1603875791.2.jpg) |
|
|
|
| cary |
Oct 28 2020, 08:26 AM
Post
#14
|
|
Advanced Member Group: Members Posts: 3,900 Joined: 26-January 04 From: Sherwood Oregon Member No.: 1,608 Region Association: Pacific Northwest |
I'd wait till you have the new patch panel in hand. To verify mold and size.
I'd take the section that attaches to the windshield frame out with a couple more cuts. That way you can lightly touch the spot welds on the glass channel with the right angle die grinder and peel them back. 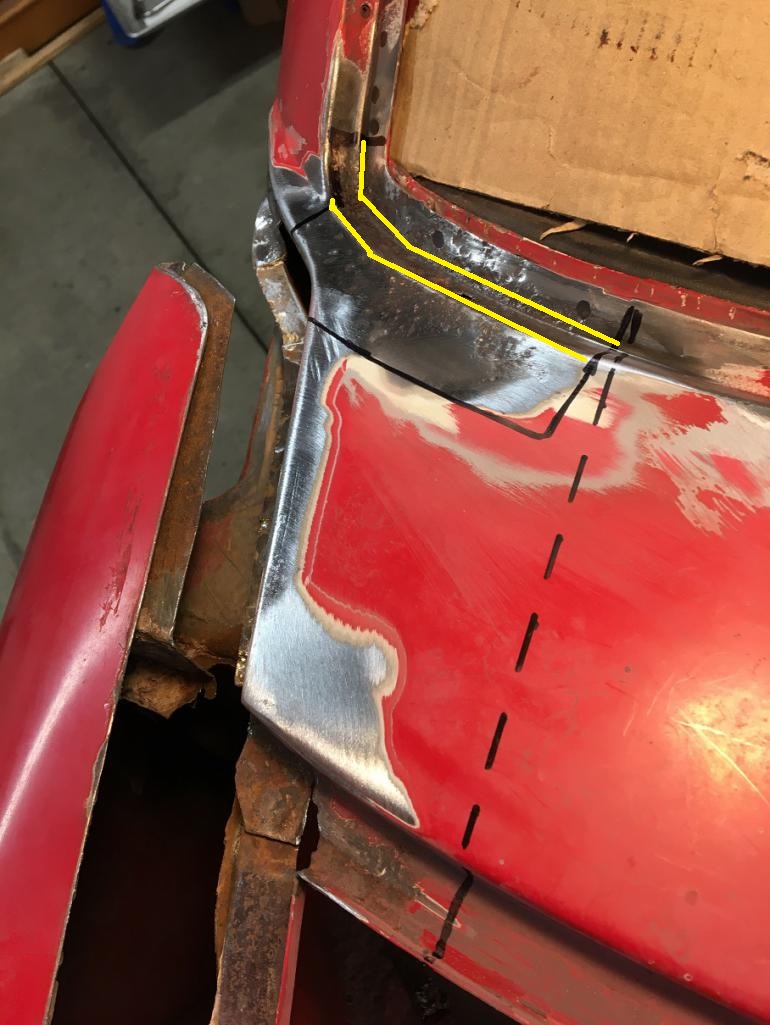 |
|
|
|
| Arno914 |
Oct 28 2020, 08:47 AM
Post
#15
|
|
Member Group: Members Posts: 233 Joined: 13-May 20 From: near Frankfurt, Germany Member No.: 24,260 Region Association: Germany |
Thanks to the detailed pics from Montreal914 I noticed that little hole underneath the fender. Looks like an ideal access for rustproofing the otherwise not reachable area between the fender walls.
I will give this area a good treatment with "Fluid Film". (IMG:style_emoticons/default/dry.gif) (IMG:http://www.914world.com/bbs2/uploads_offsite/up.picr.de-24260-1603896429.1.jpg) (IMG:http://www.914world.com/bbs2/uploads_offsite/up.picr.de-24260-1603896431.2.jpg) |
|
|
|
| Montreal914 |
Oct 28 2020, 09:29 AM
Post
#16
|
|
Senior Member Group: Members Posts: 1,818 Joined: 8-August 10 From: Claremont, CA Member No.: 12,023 Region Association: Southern California |
@cary ; Thank you for the input, that second cut will definitely help the removal of these spot welds on the windshield frame (IMG:style_emoticons/default/smile.gif) I am looking forward receiving the sheet metal to compare with the original. What I don't like about the cross cutting of the cowl (dashed line) is that I will loose many references. The little fold that I have left out by cutting below the finished surface still keeps things located.
@Arno914 ; Thank you for sharing the pictures of that beautiful fender. Yes, this will be of great help on the details, especially since there is no seam sealer anywhere. (IMG:style_emoticons/default/drooley.gif) I do have to tackle the bottom end of it too... (IMG:style_emoticons/default/rolleyes.gif) but one nightmare at a time. I have very limited experience in this type of work, but luckily, the help on this forum is simply the best. (IMG:style_emoticons/default/smilie_pokal.gif) |
|
|
|
| Montreal914 |
Nov 1 2020, 08:04 PM
Post
#17
|
|
Senior Member Group: Members Posts: 1,818 Joined: 8-August 10 From: Claremont, CA Member No.: 12,023 Region Association: Southern California |
Did a little work this WE. I removed some metal in the windshield corner area while waiting for the repair sheet metal that should arrive Wednesday. I still haven't removed the pitted area, but I am leaning towards cutting the solid marker line, not the dashed one in hope to better keep the overall line of the cowl.
We can see the factory reinforcement layer in the windshield frame corner. I didn't touch that piece, the cut is factory. 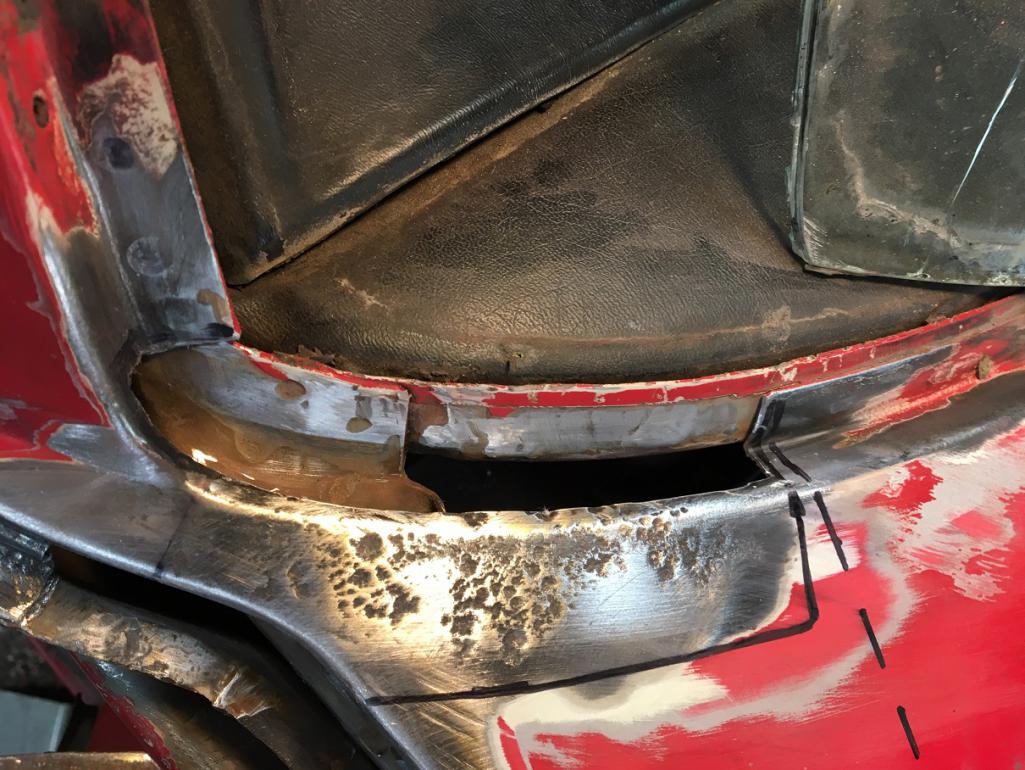 Then I removed the rusted metal in the cowl corner to the trunk seal area. This is basically ready to receive the repair sheet metal piece after some Ospho and protection. 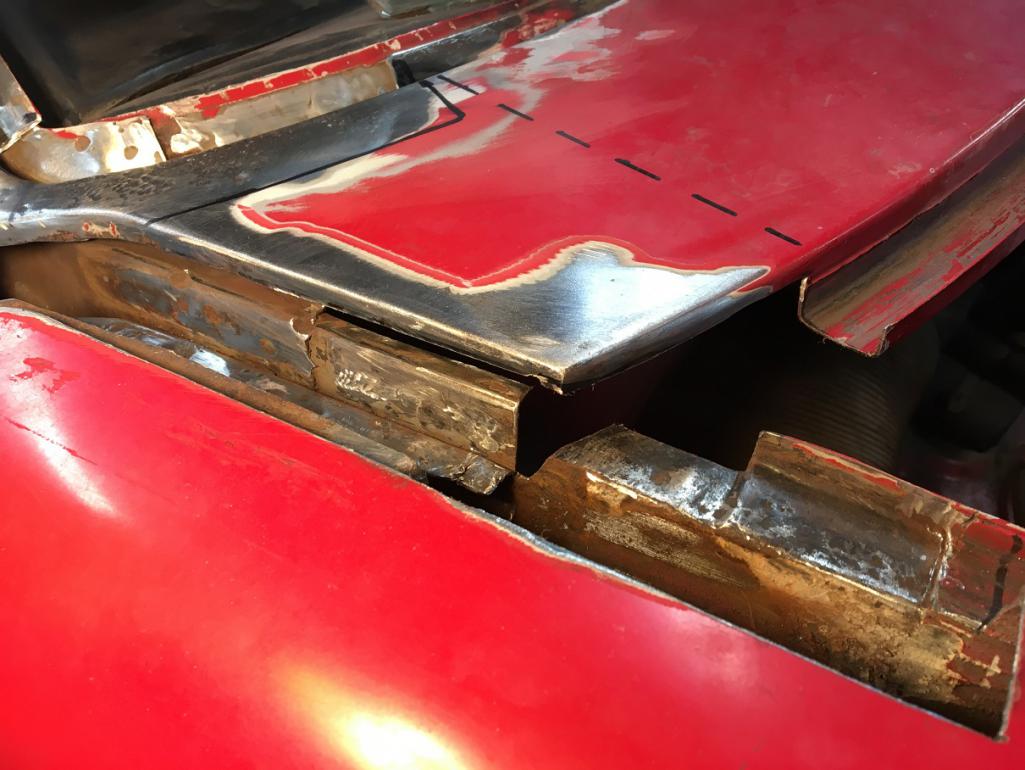 I moved on to repair some DAPO chassis weakening done to run the wiring to a very important piece of equipment (IMG:style_emoticons/default/rolleyes.gif) , an amplifier mounted on the bulkhead in front of the tank... Before;  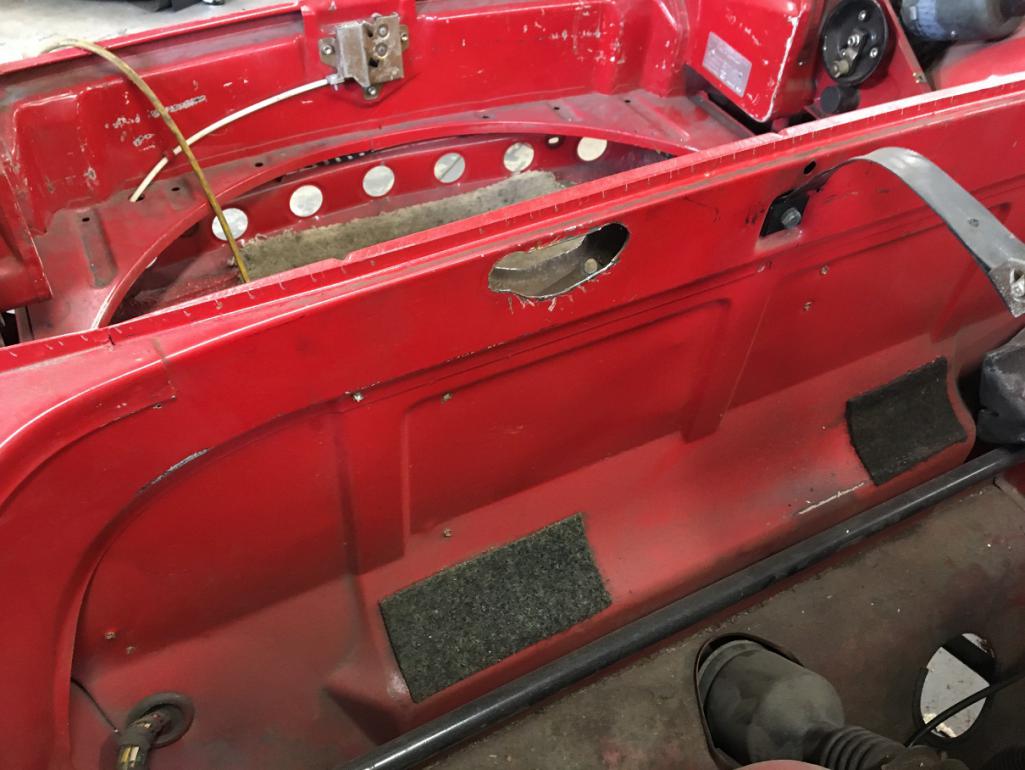 Prepared the patches to fit in the 2 holes, file, adjust, try, and again, until good fit... The bulkhead is actually thin metal ~0.030" while the back side of that beam is closer to 16 ga. Luckily, I had pieces of metal of the same thicknesses. (IMG:style_emoticons/default/smile.gif) Bulkhead layer patched: 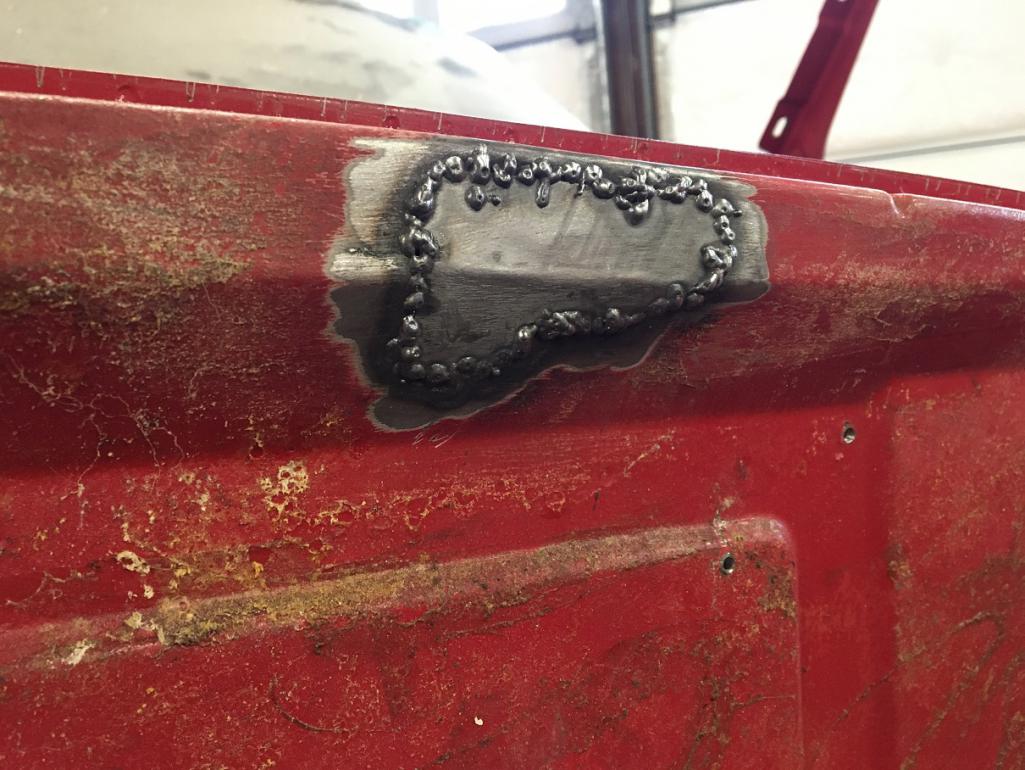 Then the back side (tank side) of the cross beam piece. 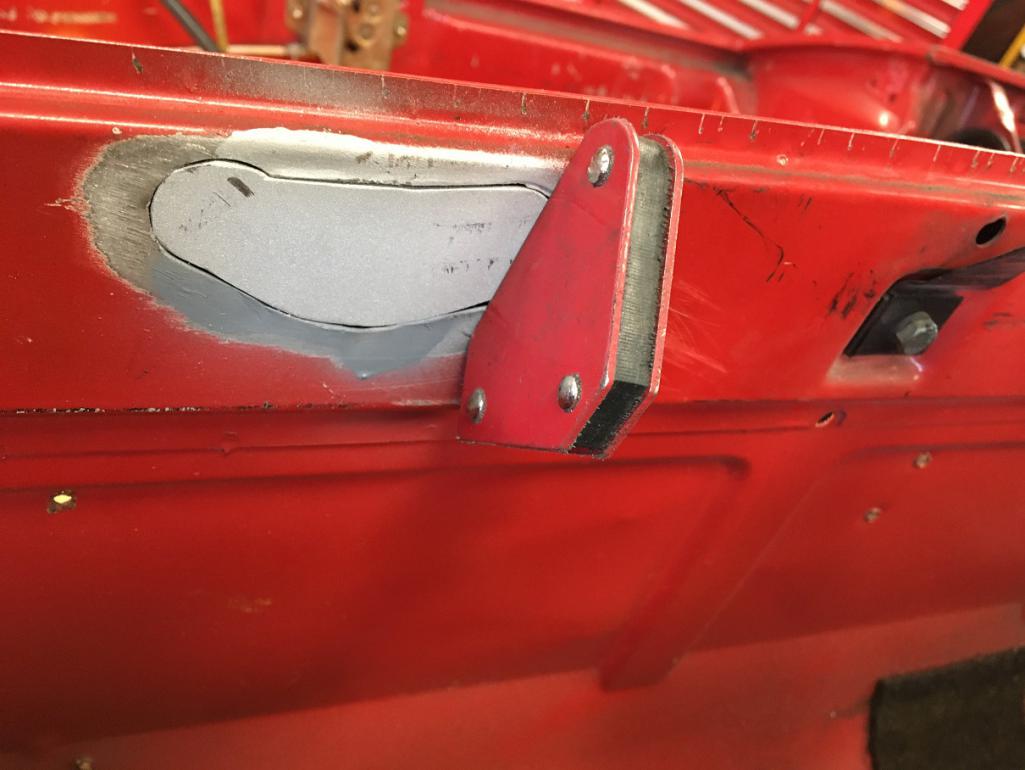 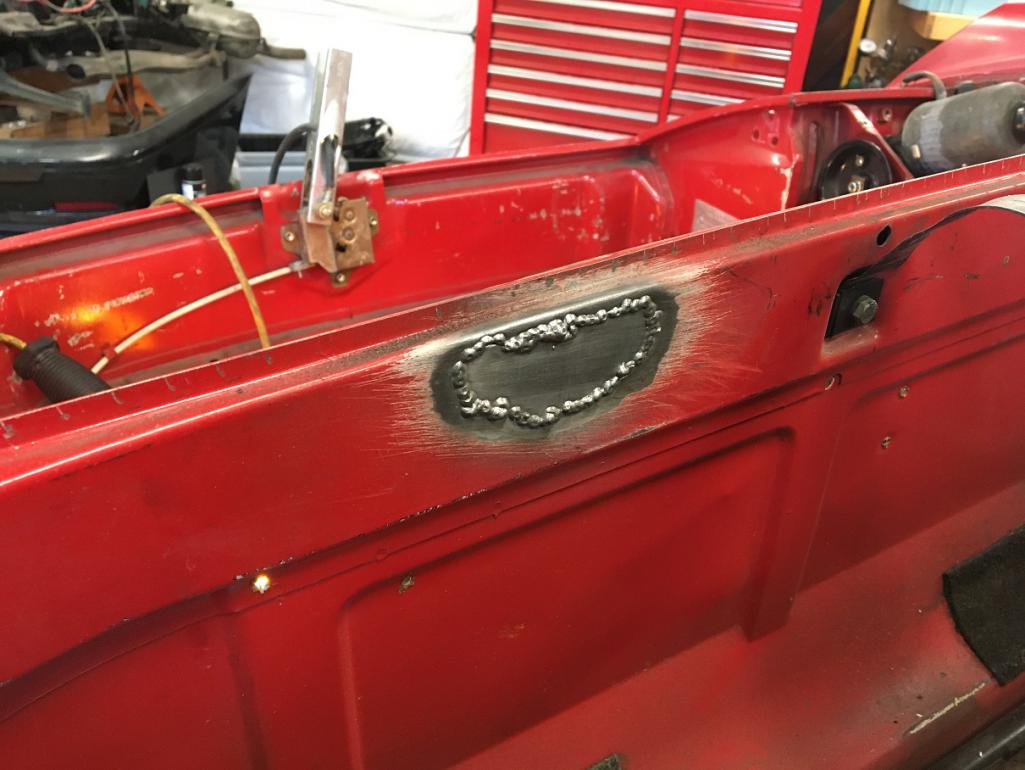 Small steps... (IMG:style_emoticons/default/smile.gif) |
|
|
|
| Montreal914 |
Nov 6 2020, 12:50 AM
Post
#18
|
|
Senior Member Group: Members Posts: 1,818 Joined: 8-August 10 From: Claremont, CA Member No.: 12,023 Region Association: Southern California |
Yesterday I received my sheet metal repair pieces, the cowl and rear top fender parts.
The cowl piece is pretty nice and I am still wondering what should be my best approach with this. I can keep as much original metal to the car and cut all up the repair panel to patch the various areas, Or cut straight across the car's cowl and install about half of the width of the repair piece. (IMG:style_emoticons/default/idea.gif) Here are a few pictures of the cowl piece. 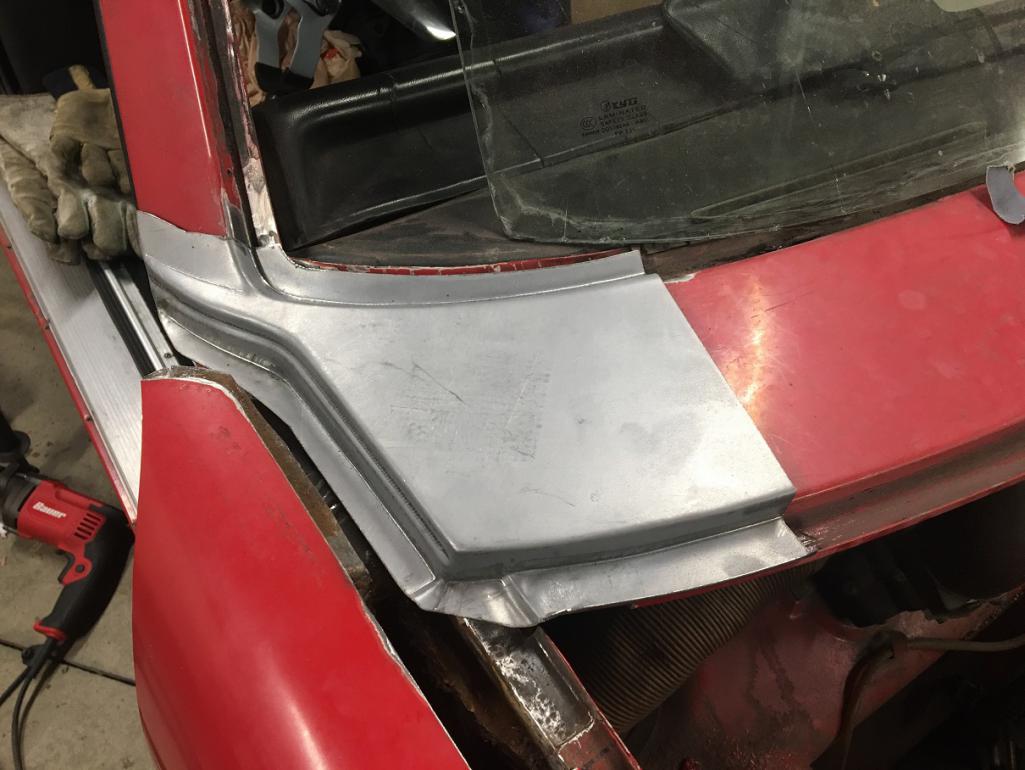 Here we can see that hey could have been more generous on the front fold for the trunk seal. I will need to extend that lip a little. 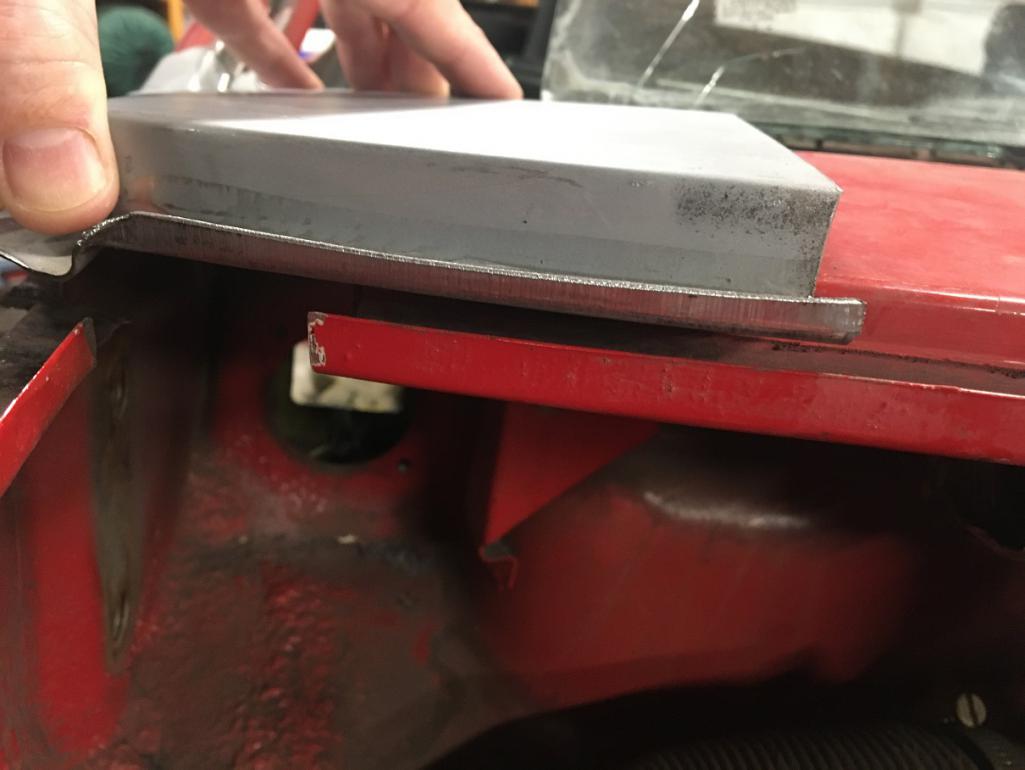 Last one showing the line where I could cut the new piece to repair the damaged sections of the car, otherwise, just use the left (car orientation) half of the repair piece and cut the car up. 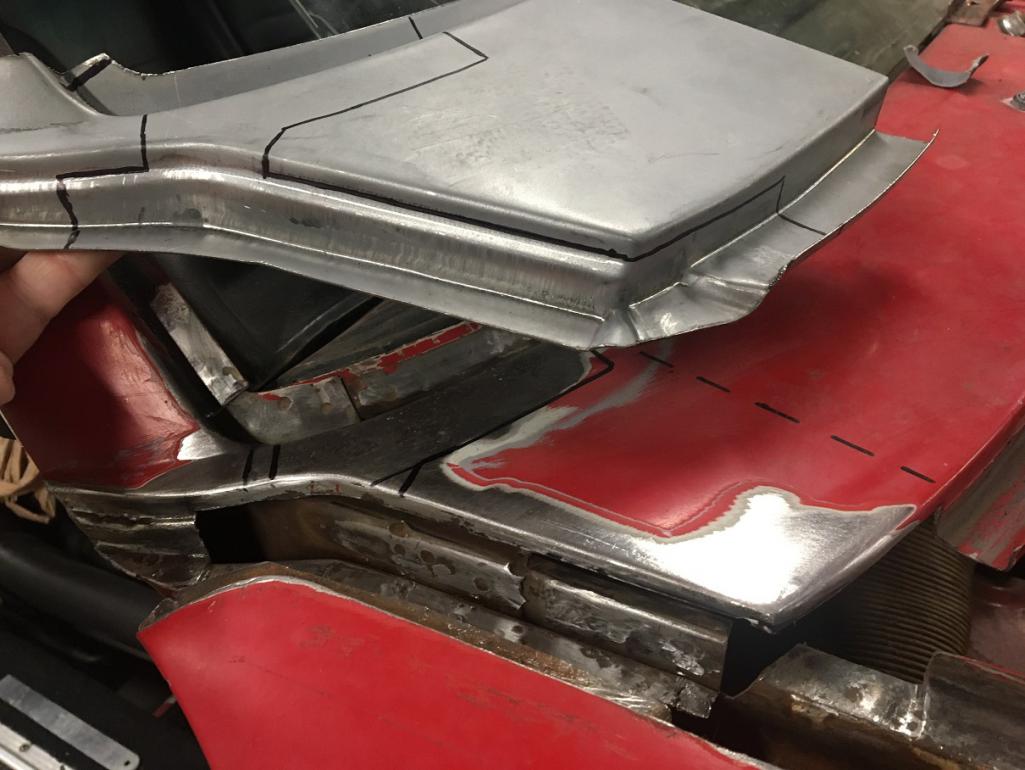 Moving on to the fender repair panel. This one is made for Auto Atlanta but is not the same quality as the cowl piece. The part was bent of hit or something as you can see. Also, the curved outside edge that will create the door gap is not folded. This will be a challenge (at least for me) to fold while creating the proper curve that will define the front top door gap. Definitely open to suggestions here... 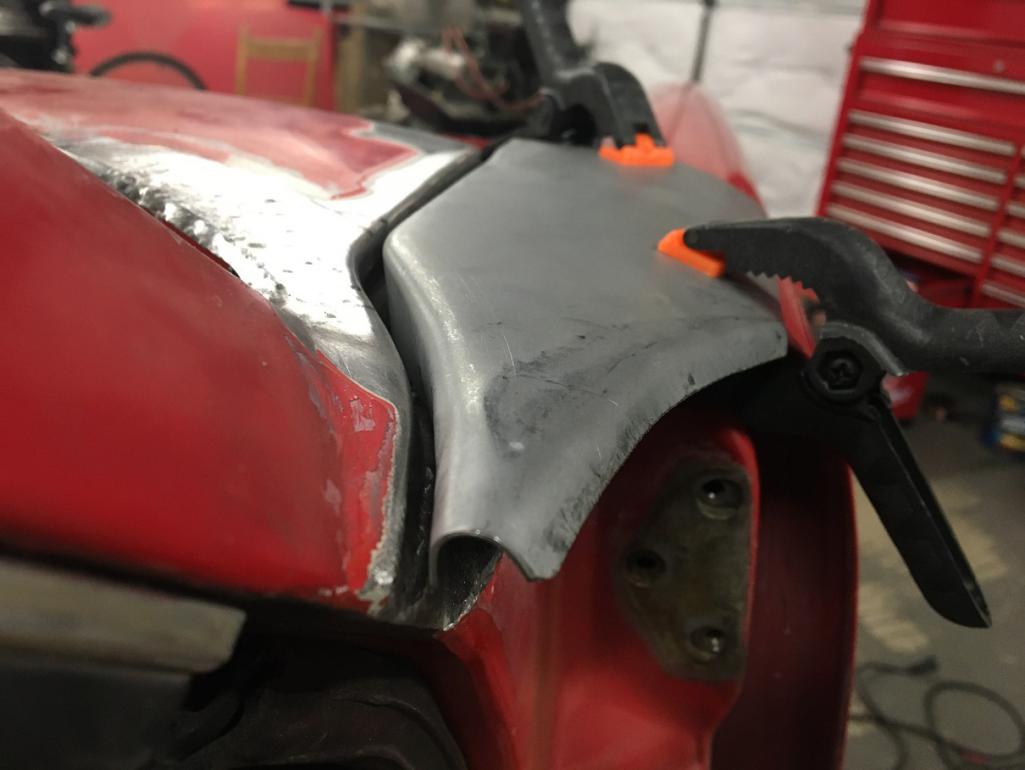 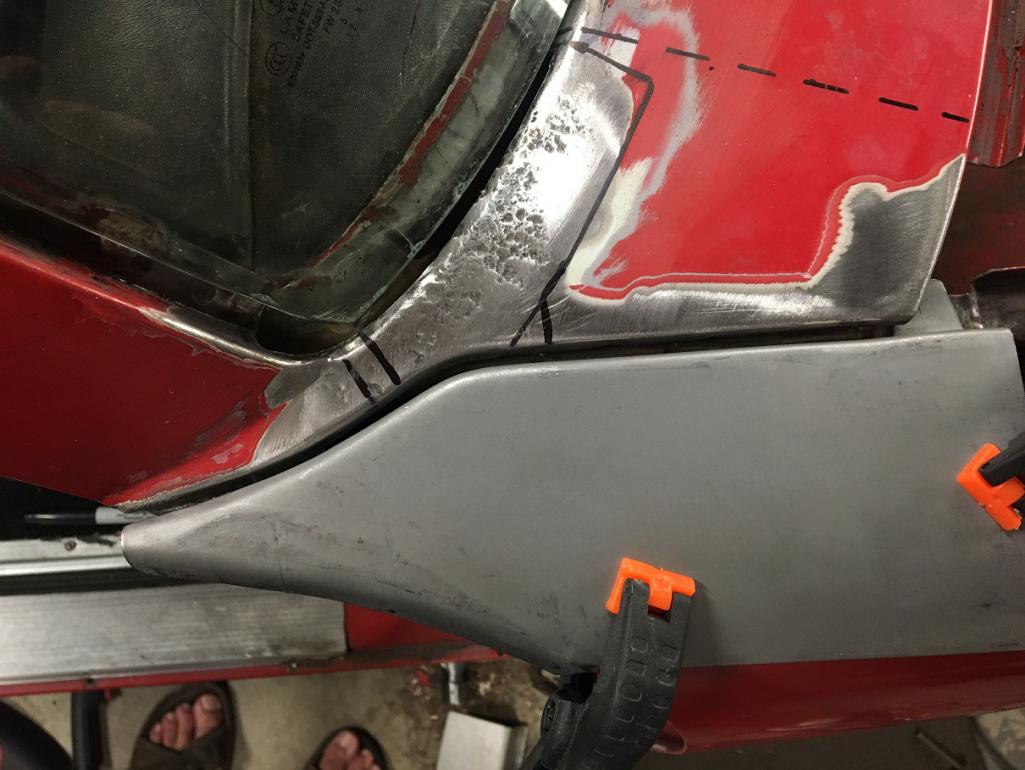 In this angle you can see the damaged area of the part which lifts up the back side of it... (IMG:style_emoticons/default/dry.gif) 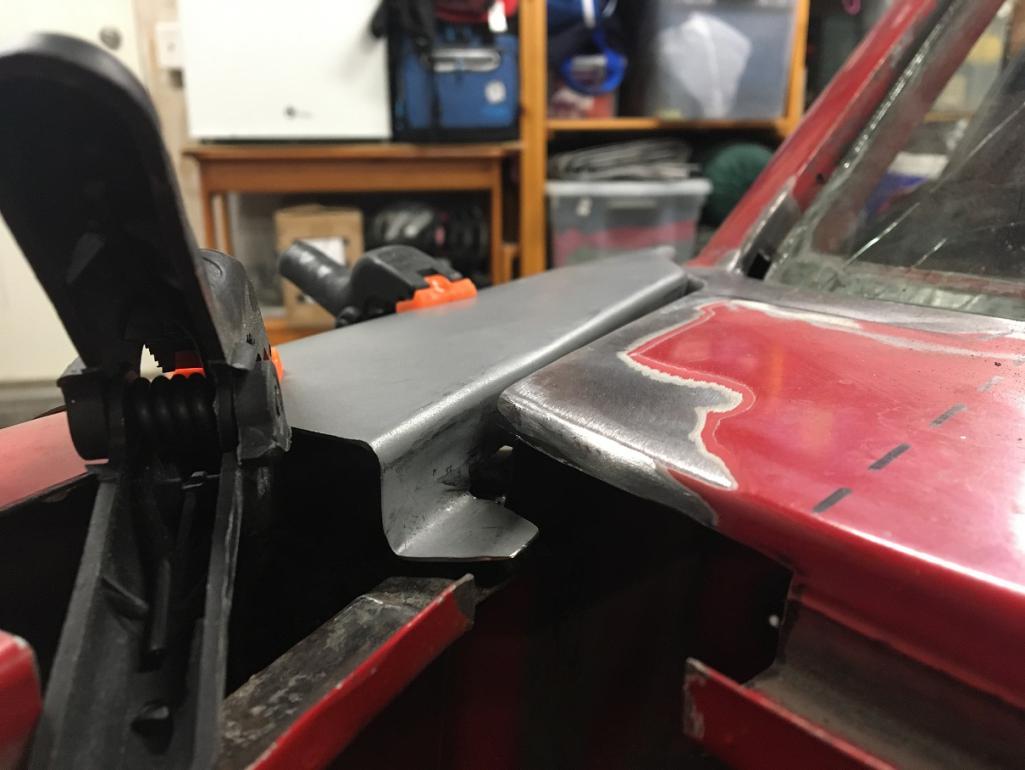 I would like to tackle the cowl repair this weekend, but before that, I need to decide how. (IMG:style_emoticons/default/headbang.gif) Open to comments/suggestions. Thanks! (IMG:style_emoticons/default/beerchug.gif) |
|
|
|
| cary |
Nov 6 2020, 12:08 PM
Post
#19
|
|
Advanced Member Group: Members Posts: 3,900 Joined: 26-January 04 From: Sherwood Oregon Member No.: 1,608 Region Association: Pacific Northwest |
Your now into what we/I call the art of massaging patch panels. Almost all need
tuning. Give us a shot of the fender patch flipped over. |
|
|
|
| horizontally-opposed |
Nov 6 2020, 12:16 PM
Post
#20
|
|
Advanced Member Group: Members Posts: 3,456 Joined: 12-May 04 From: San Francisco Member No.: 2,058 Region Association: None |
QUOTE(Arno914 @ Oct 28 2020, 01:03 AM)  Hi, here are pics of a NOS Fender I aquired a long time ago. Maybe that helps to understand the construction. Greetings, Arno (IMG:http://www.914world.com/bbs2/uploads_offsite/up.picr.de-24260-1603875790.1.jpg) (IMG:http://www.914world.com/bbs2/uploads_offsite/up.picr.de-24260-1603875791.2.jpg) It sure does—to the point I am pretty sure I know what the problem with my fender was, and maybe still is, now. |
|
|
|
|
1 User(s) are reading this topic (1 Guests and 0 Anonymous Users)
0 Members:

|
Lo-Fi Version | Time is now: 10th May 2025 - 12:43 AM |
Invision Power Board
v9.1.4 © 2025 IPS, Inc.