|
|
|
Porsche, and the Porsche crest are registered trademarks of Dr. Ing. h.c. F. Porsche AG.
This site is not affiliated with Porsche in any way. Its only purpose is to provide an online forum for car enthusiasts. All other trademarks are property of their respective owners. |
|
|


| pencap914 |
 Jun 18 2020, 02:21 PM Jun 18 2020, 02:21 PM
Post
#1
|
|
Member  Group: Members Posts: 81 Joined: 16-April 06 Member No.: 5,872 Region Association: Northern California |
Hi all,
Picked up project car about 2 weeks ago. I'm very excited to get started on this build, I'll try to document and share my progress as I go. I originally created a profile here at 914World back in 2006 when I was in High school, and had bought a 74 914 as my first car for $1200. It was a great first car, I had a lot of fun fixing it up while using it as my daily. When I went off to college, I sold the car, but felt like I had unfinished business to do. Recently I started lurking here again looking to get back into a project 914 to hopefully take the car where I wanted to, but didn't have the funds, skills, or space to do so. I posted a WTB ad, and was contacted by a member here who had a good start to a project I plan on finishing (Thanks Montreal914!) My plan is to build my dream 914 that I absolutely drooled over when I was in High School. I've always loved the GT look, so my plan is to basically create as close to a GT clone as my budget will allow. Steel GT flares, 5-lug Fuch's (or replicas...) and a tastefully somewhat period correct interior. The car I recently purchased did include a freshly rebuilt 2.0 4cyl engine, so I need to make a decision on if I would want to run that engine for a while, and save my pennies to slowly build a 2.2, 2.4 or 2.7 flat 6 then do a swap later down the road. I'm happy to see the 914 community thriving. Back in 2004 when I first bought the 914, Porsche snobs seemed to turn their nose at them which made them affordable enough for a high-school kid to own one. It seems like the 914 is getting more recognition in the collector community, so I'm happy I picked one up before they become too out of my price range! I'll post some progress photos tonight and general status of the car tonight after work, but here's a few shots of the day I unloaded it off the trailer. Cheers, pencap914 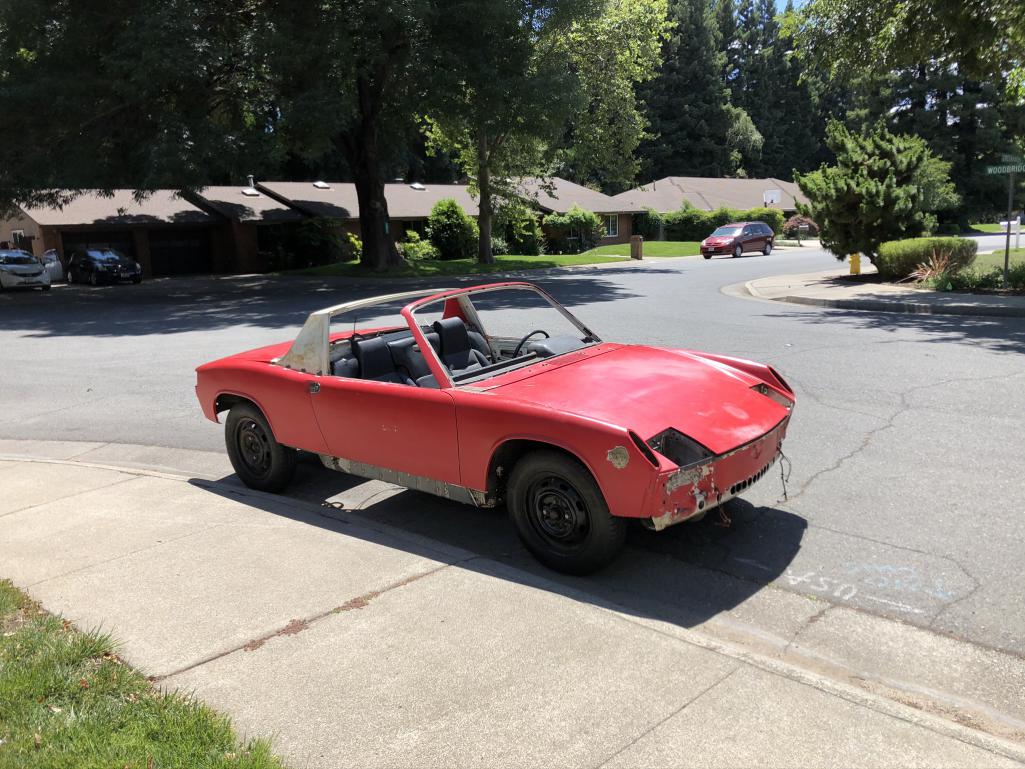 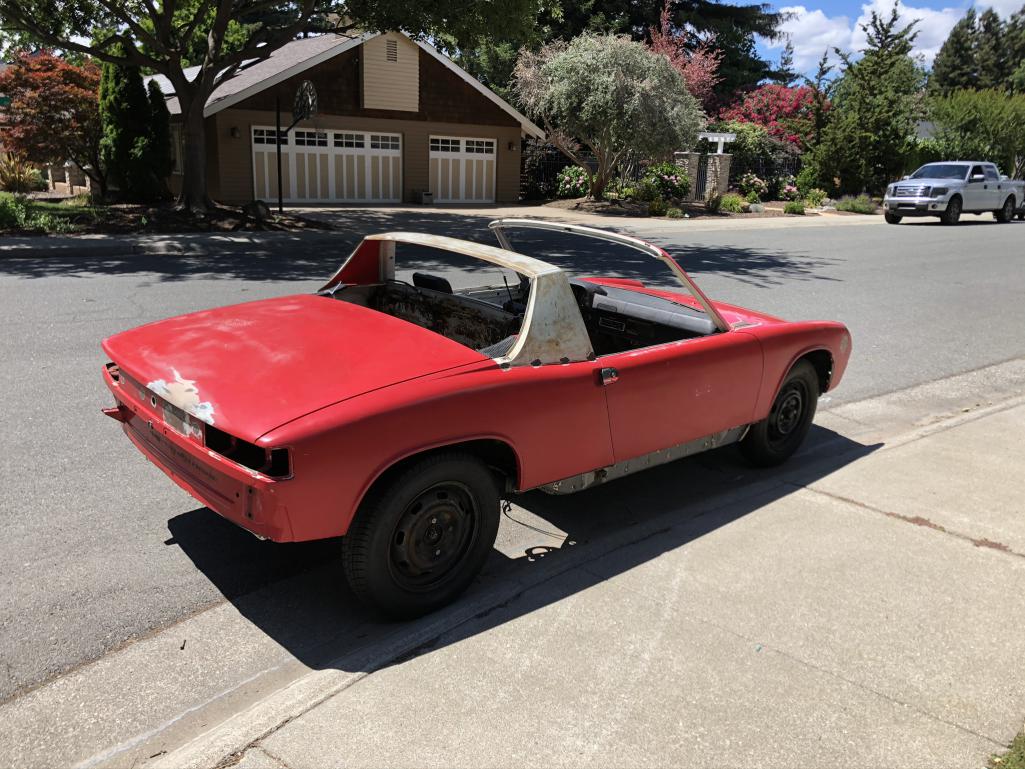 |
   |

 
|
  |
Replies(1 - 19)
| iankarr |
Jun 18 2020, 02:31 PM
Post
#2
|
|
The wrencher formerly known as Cuddy_K Group: Members Posts: 2,600 Joined: 22-May 15 From: Heber City, UT Member No.: 18,749 Region Association: Intermountain Region |
Welcome back! Excited to see how your build progresses. Lots of helpful people here....
|
|
|
|
| ValcoOscar |
Jun 18 2020, 02:41 PM
Post
#3
|
|
Garage Life Group: Members Posts: 2,619 Joined: 19-November 13 From: SoCal Member No.: 16,669 Region Association: Southern California |
Great @pencap914
What a great decision to jump in headfirst. Montreal914 is a good guy! You have my attention as I have 5 widebodies in my P stable. Powered by 4's, 6's & 8's None are Concours but are sound. You're more than welcome to come look anytime you're in OC (90621). Keep your dream alive. (IMG:style_emoticons/default/beerchug.gif) Oscar |
|
|
|
| Cairo94507 |
Jun 18 2020, 03:32 PM
Post
#4
|
|
Michael Group: Members Posts: 10,634 Joined: 1-November 08 From: Auburn, CA Member No.: 9,712 Region Association: Northern California |
(IMG:style_emoticons/default/welcome.png) Welcome back to the fold. You will have a ball getting that car ready to drive. I would run the 4 cylinder and drive the car while you source/collect all of the bits you will need for the 6 conversion. As you likely already know, rust is the death nail on these cars so address any and all rust issues first and build from a solid rust-free chassis. (IMG:style_emoticons/default/beerchug.gif)
|
|
|
|
| pencap914 |
Jun 19 2020, 12:05 PM
Post
#5
|
|
Member Group: Members Posts: 81 Joined: 16-April 06 Member No.: 5,872 Region Association: Northern California |
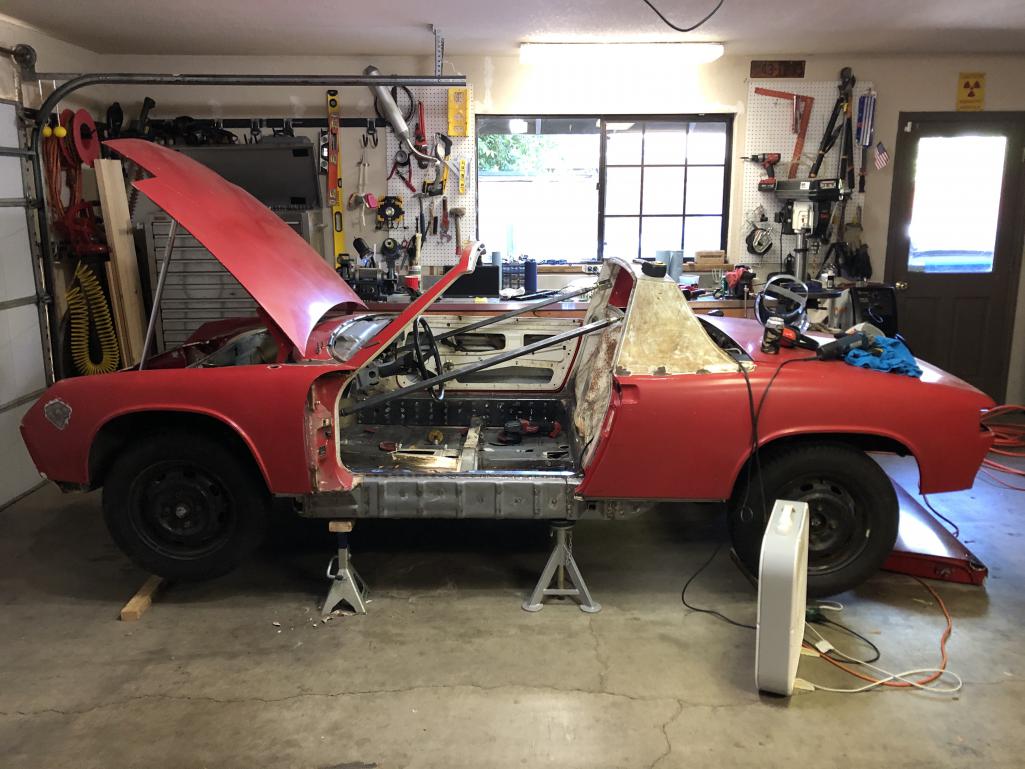
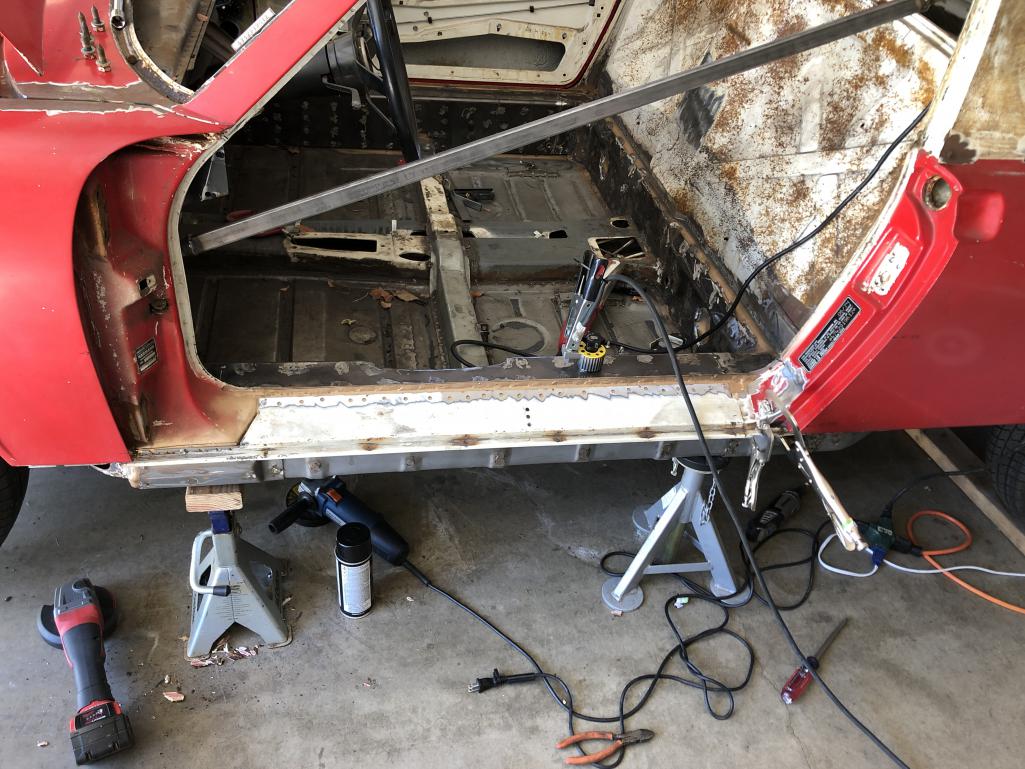
Previous to the last owner, the rear floor pans, hell hole, battery tray, and part of the fire wall were repaired using panels from restoration designs. Which works great for me, because I have some welding experience, but almost none with thin automotive sheet metal. It would have been a brutal learning curve to attempt to fix everything on my own, so I'm happy to report the car is virtually* rust free.
Inner and outer longitudinal stiffening kits were installed before I acquired the car, however the inner kit (Engman?) did tweak the pan to close the gap between the windshield frame and the roll bar by about 1/8" on each side. (Measuring 25" almost dead even on each side currently) So the door gaps are a little off as well. It looks like this is a know risk of installing this kit, and it looks like a few members here have been able to correct this issue by simply making a few strategic cuts in the stiffening kit, jacking the car then re-welding it back into place. I bought the car with the drivetrain and most of the interior removed, all that was left for me to remove was the wiring harness, dashboard, and the HVAC. So currently, the car is an empty shell with wheels to roll it around if needed. I have more photos to share if I could only get iCloud to sync.... I miss the days of SD cards. 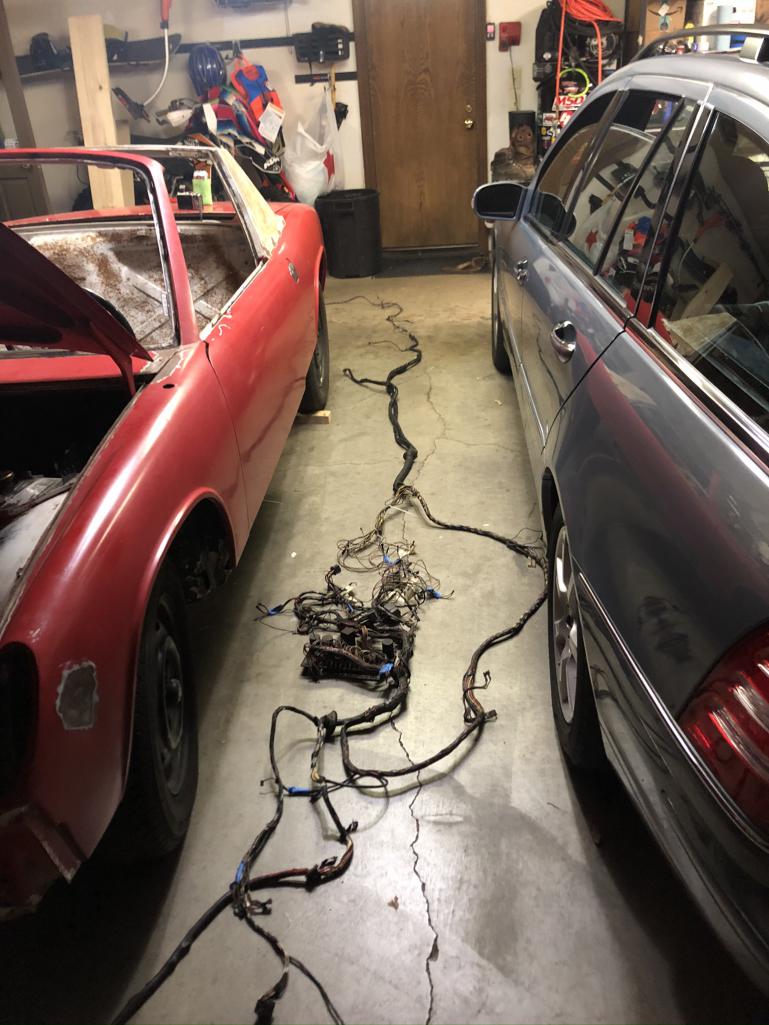 |
|
|
|
| Nojoah |
Jun 19 2020, 03:11 PM
Post
#6
|
|
Member Group: Members Posts: 119 Joined: 6-May 20 From: Ontario Member No.: 24,234 Region Association: Canada |
Seems like a good car to start your build. More pictures... damn iCloud!
|
|
|
|
| pencap914 |
Oct 5 2020, 08:54 PM
Post
#7
|
|
Member Group: Members Posts: 81 Joined: 16-April 06 Member No.: 5,872 Region Association: Northern California |
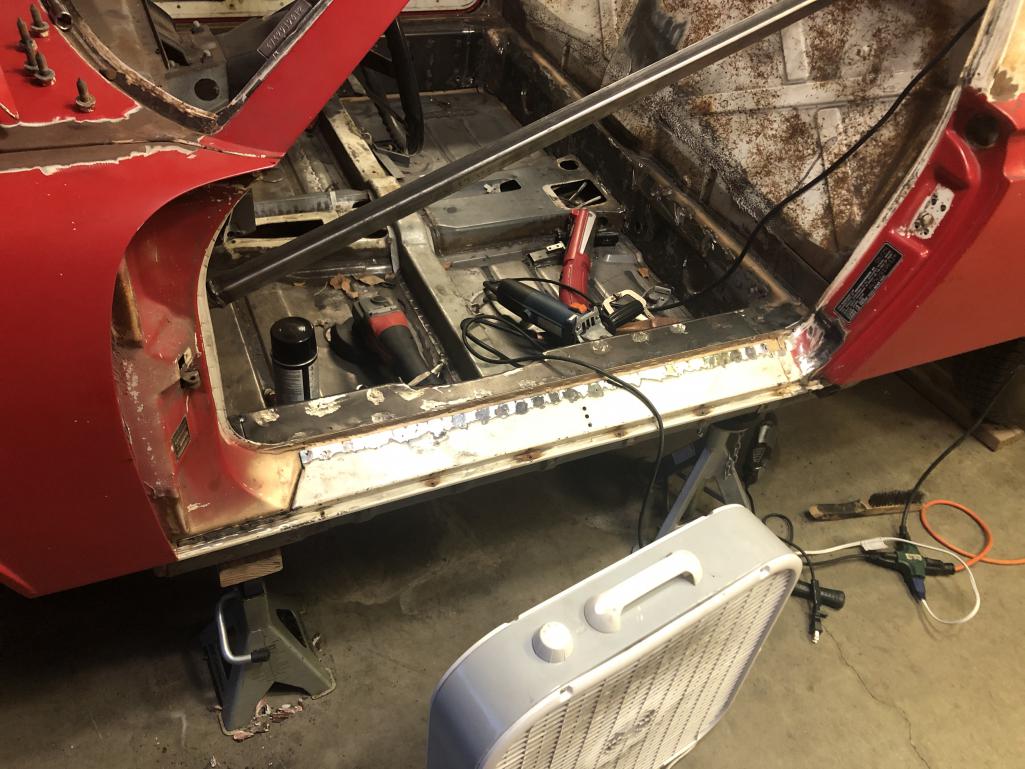
Summer is the busy season for work, so I haven't had much time to work on the car, but I was able to create door braces, and weld back the lower door panels that were removed to install the outer long stiffening kit.
 |
|
|
|
| pencap914 |
Oct 5 2020, 08:55 PM
Post
#8
|
|
Member Group: Members Posts: 81 Joined: 16-April 06 Member No.: 5,872 Region Association: Northern California |
 |
|
|
|
| pencap914 |
Oct 5 2020, 08:55 PM
Post
#9
|
|
Member Group: Members Posts: 81 Joined: 16-April 06 Member No.: 5,872 Region Association: Northern California |
 |
|
|
|
| pencap914 |
Oct 5 2020, 08:57 PM
Post
#10
|
|
Member Group: Members Posts: 81 Joined: 16-April 06 Member No.: 5,872 Region Association: Northern California |
 |
|
|
|
| pencap914 |
Oct 5 2020, 09:04 PM
Post
#11
|
|
Member Group: Members Posts: 81 Joined: 16-April 06 Member No.: 5,872 Region Association: Northern California |
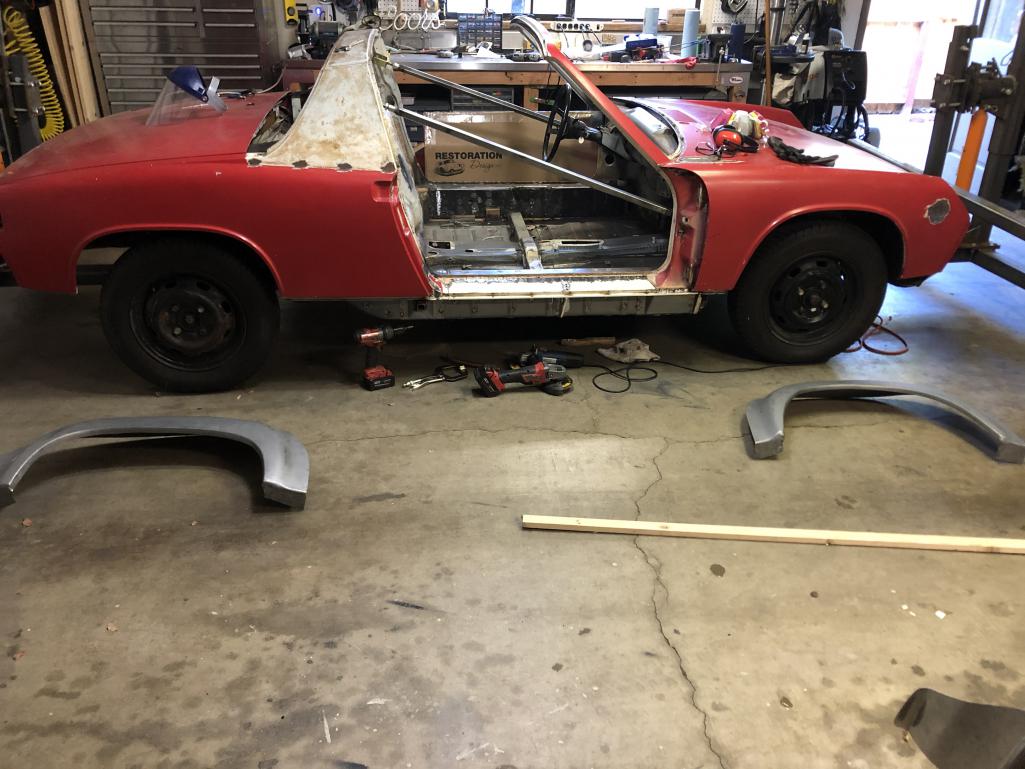
Next move: Steel Flare installation :-)
 |
|
|
|
| JeffBowlsby |
Oct 5 2020, 09:10 PM
Post
#12
|
|
914 Wiring Harnesses & Beekeeper Group: Members Posts: 9,251 Joined: 7-January 03 From: San Ramon CA Member No.: 104 Region Association: None |
Nevermind, carry on.
|
|
|
|
| pencap914 |
Nov 17 2020, 11:16 PM
Post
#13
|
|
Member Group: Members Posts: 81 Joined: 16-April 06 Member No.: 5,872 Region Association: Northern California |
Made some progress on adding the flares. Still a bit of a luddite for finding the best way to share photos here...
https://drive.google.com/drive/folders/1Z9X...8JD?usp=sharing |
|
|
|
| seanpaulmc |
Nov 18 2020, 06:00 AM
Post
#14
|
|
Member Group: Members Posts: 449 Joined: 6-December 16 From: Orlando, FL Member No.: 20,649 Region Association: South East States |
Sweet work!
Not looking budget to me. What size is that six? Going back to white? GT flared cars look great in white IMO. Question and request: How did you attach the door braces under the dash? Would you show some pictures of that area. Did you have a lot of work on the longs and need to take the doors on and off to check? Thanks and keep up your super work. Sean |
|
|
|
| mb911 |
Nov 18 2020, 06:59 AM
Post
#15
|
|
914 Guru Group: Members Posts: 7,766 Joined: 2-January 09 From: Burlington wi Member No.: 9,892 Region Association: Upper MidWest |
Looks great so far. Let me know if I can help with any parts in the future..or just advice.
|
 |
|
| rgalla9146 |
Nov 18 2020, 07:19 AM
Post
#16
|
|
Advanced Member Group: Members Posts: 4,961 Joined: 23-November 05 From: Paramus NJ Member No.: 5,176 Region Association: None |
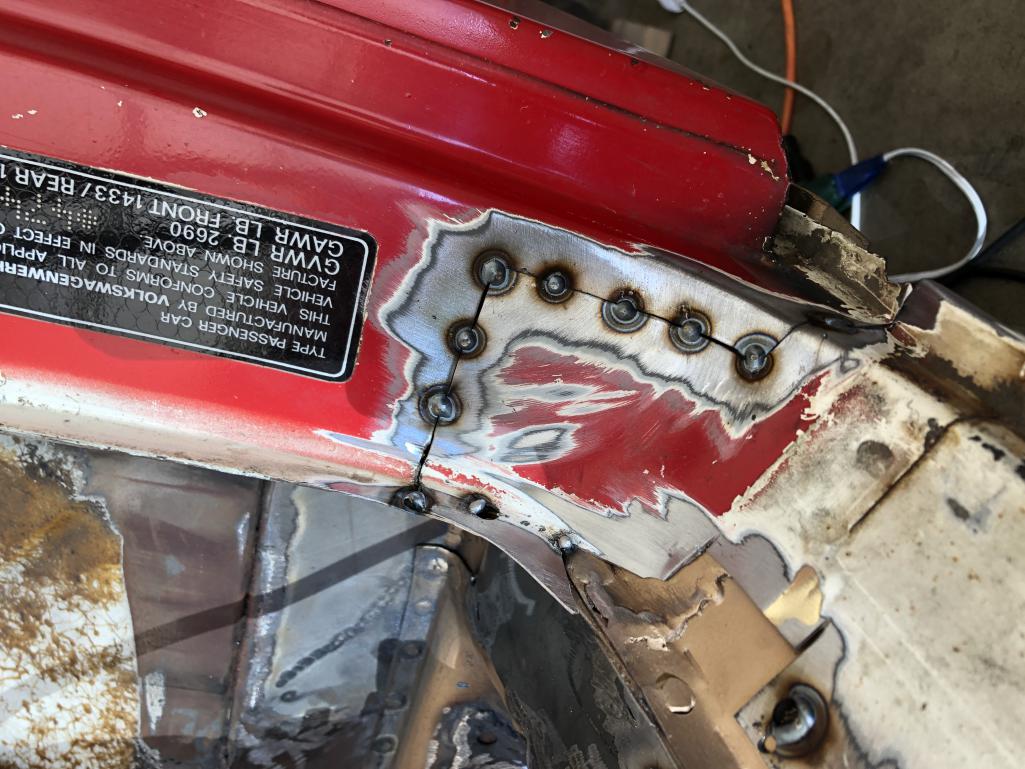
Your welding skills are just fine if the patch under the compliance sticker is any indication. The original white is the optimum, finest, fastest, most beautiful, easiest, lightest and sneakiest color. That's what I'VE heard. (IMG:style_emoticons/default/smile.gif) Great start.... carry on ! |
|
|
|
| pencap914 |
Nov 18 2020, 04:50 PM
Post
#17
|
|
Member Group: Members Posts: 81 Joined: 16-April 06 Member No.: 5,872 Region Association: Northern California |
QUOTE(seanpaulmc @ Nov 18 2020, 04:00 AM)  Sweet work! Not looking budget to me. What size is that six? Going back to white? GT flared cars look great in white IMO. Question and request: How did you attach the door braces under the dash? Would you show some pictures of that area. Did you have a lot of work on the longs and need to take the doors on and off to check? Thanks and keep up your super work. Sean Thanks for the kind words! I certainly wouldn't mind going back with Light Ivory. I originally picked up a 2.4 "7R" engine, but I found a pretty good deal on a 2.7 engine from a 75 that should kick this thing along just fine. The PO did the inner and outer stiffening kits, so I never got to see how the original longs looked before they got encased. Judging by the rest of the car, I would imagine they had little notable damage. See below for how I attached the door brace to the front of the car. I made it so it (shouldnt) be difficult to dremel cut the weld tacks then grind flat like it never happened. 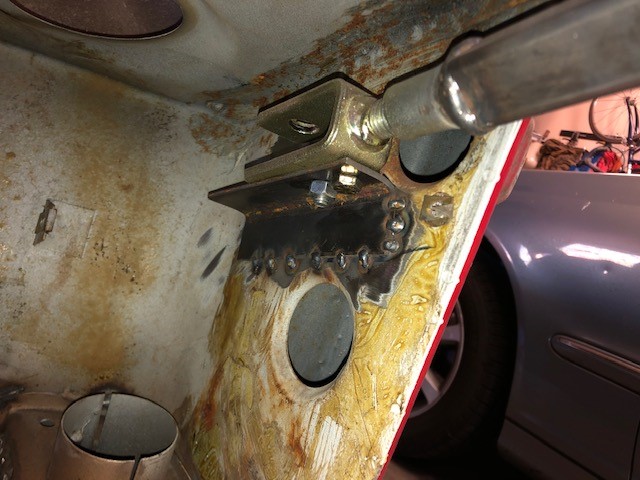 |
|
|
|
| seanpaulmc |
Nov 18 2020, 06:41 PM
Post
#18
|
|
Member Group: Members Posts: 449 Joined: 6-December 16 From: Orlando, FL Member No.: 20,649 Region Association: South East States |
QUOTE(pencap914 @ Nov 18 2020, 05:50 PM) QUOTE(seanpaulmc @ Nov 18 2020, 04:00 AM) Sweet work! Not looking budget to me. What size is that six? Going back to white? GT flared cars look great in white IMO. Question and request: How did you attach the door braces under the dash? Would you show some pictures of that area. Did you have a lot of work on the longs and need to take the doors on and off to check? Thanks and keep up your super work. Sean Thanks for the kind words! I certainly wouldn't mind going back with Light Ivory. I originally picked up a 2.4 "7R" engine, but I found a pretty good deal on a 2.7 engine from a 75 that should kick this thing along just fine. The PO did the inner and outer stiffening kits, so I never got to see how the original longs looked before they got encased. Judging by the rest of the car, I would imagine they had little notable damage. See below for how I attached the door brace to the front of the car. I made it so it (shouldnt) be difficult to dremel cut the weld tacks then grind flat like it never happened. Perfect. Just what I needed. Been thinking of something similar but helps to see it done already. Thank you! |
|
|
|
| pencap914 |
Nov 18 2020, 07:13 PM
Post
#19
|
|
Member Group: Members Posts: 81 Joined: 16-April 06 Member No.: 5,872 Region Association: Northern California |
QUOTE(mb911 @ Nov 18 2020, 04:59 AM) Looks great so far. Let me know if I can help with any parts in the future..or just advice. Thanks Ben! Got your oil tank and engine sheet metal. I haven't yet done the research for what its going to take to mount that 914/6 oil tank... I'll need to cut the car for the oil here pretty soon, so I'll need to gather the hardware to mock-mount that. Any suggestions on where to find the mounting hardware for the tank? I was just going to use a parts diagram from Auto Atlanta and either source the parts from the hardware store or just purchase them from AA. |
|
|
|
| mb911 |
Nov 18 2020, 07:16 PM
Post
#20
|
|
914 Guru Group: Members Posts: 7,766 Joined: 2-January 09 From: Burlington wi Member No.: 9,892 Region Association: Upper MidWest |
QUOTE(pencap914 @ Nov 18 2020, 05:13 PM) QUOTE(mb911 @ Nov 18 2020, 04:59 AM) Looks great so far. Let me know if I can help with any parts in the future..or just advice. Thanks Ben! Got your oil tank and engine sheet metal. I haven't yet done the research for what its going to take to mount that 914/6 oil tank... I'll need to cut the car for the oil here pretty soon, so I'll need to gather the hardware to mock-mount that. Any suggestions on where to find the mounting hardware for the tank? I was just going to use a parts diagram from Auto Atlanta and either source the parts from the hardware store or just purchase them from AA. You just really need 2 8mm bolts through the bolt holes you will drill in the factory locations. Once you have that make a template of the tank to transfer the hole layout. The trickiest hole is the return line. Be on the look out for black friday deals.. |
|
|
|
|
2 User(s) are reading this topic (2 Guests and 0 Anonymous Users)
0 Members:

|
Lo-Fi Version | Time is now: 18th May 2026 - 04:40 AM |
Invision Power Board
v9.1.4 © 2026 IPS, Inc.