|
|
|
Porsche, and the Porsche crest are registered trademarks of Dr. Ing. h.c. F. Porsche AG.
This site is not affiliated with Porsche in any way. Its only purpose is to provide an online forum for car enthusiasts. All other trademarks are property of their respective owners. |
|
|

  |

| DRPHIL914 |
 Jan 16 2020, 04:57 PM Jan 16 2020, 04:57 PM
Post
#1
|
|
Dr. Phil  Group: Members Posts: 5,758 Joined: 9-December 09 From: Bluffton, SC Member No.: 11,106 Region Association: South East States |
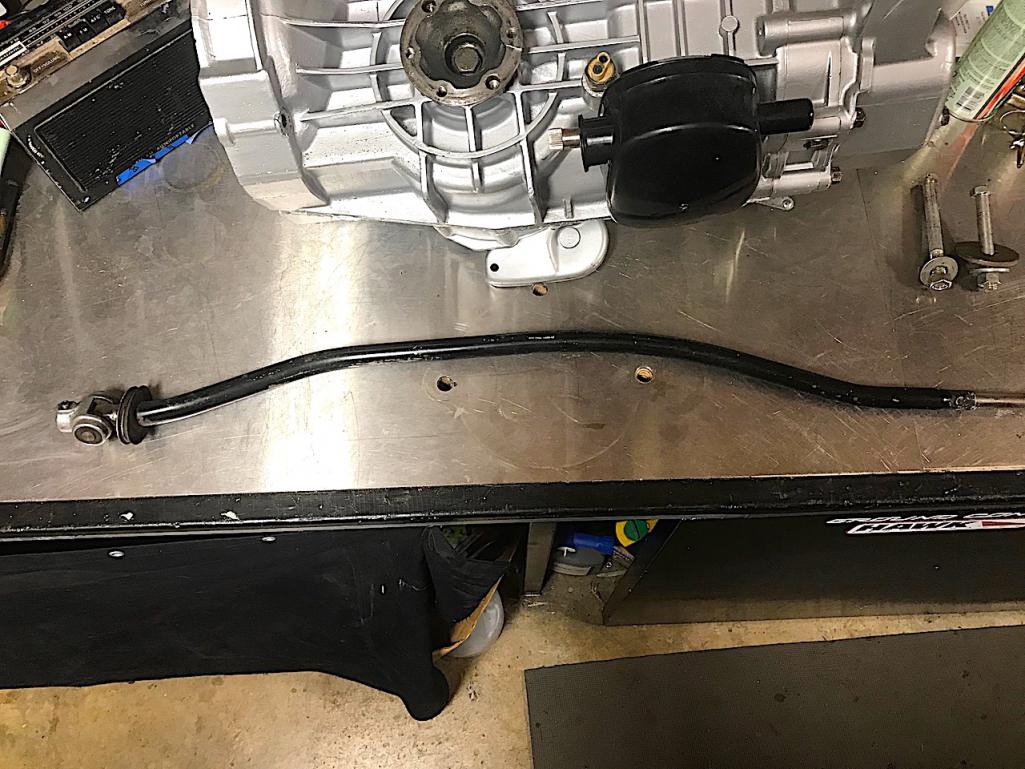
A few issues here , after the bushing disintegrated I ordered new stuff, a new firewall bushing from RIX914PARTS and other goodies from 914rubber.com, and a new brass bushing for the coupling, however I can’t get the pin out, and I’m going to mess up the pin end and it’s not going to slide thru if I do that- so I’m going to have to find a press I guess somewhere?
1. Should it be that tight ? 2. Is this a normal weld end? Attached thumbnail(s) 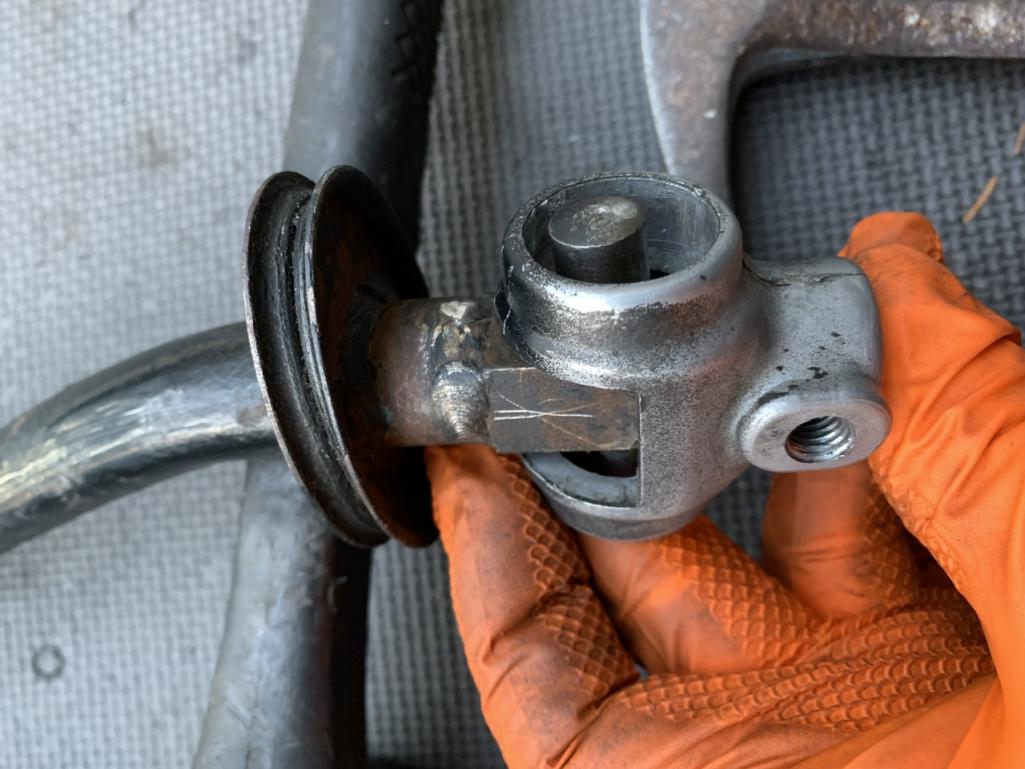 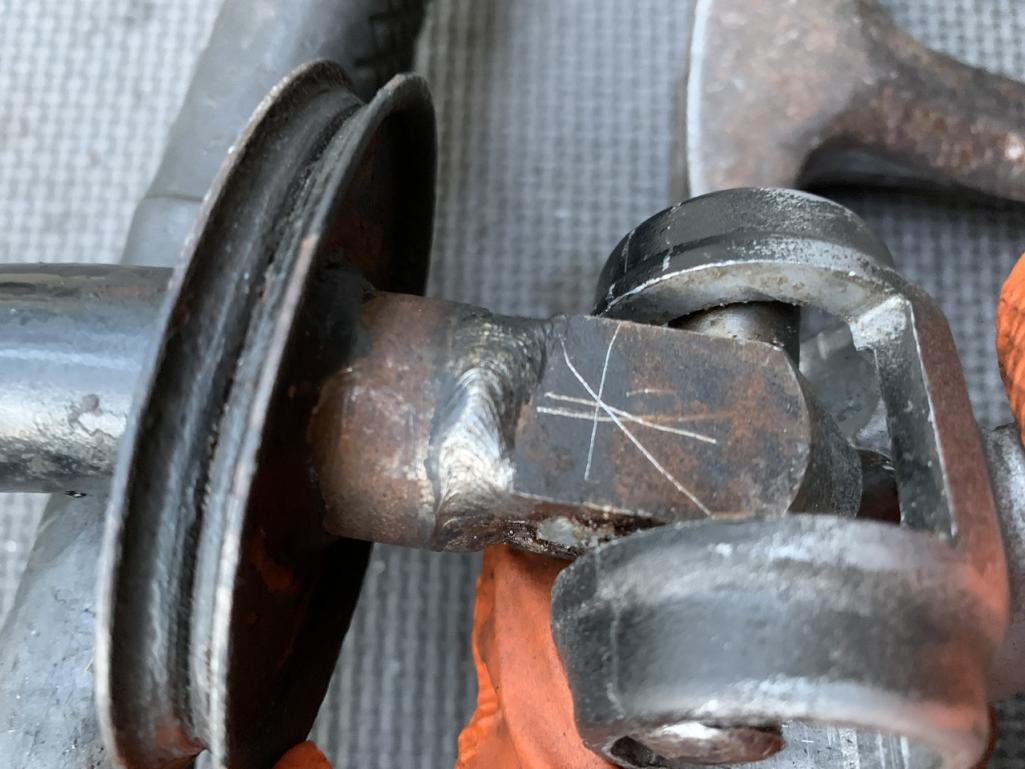
|
   |

 
|
| dr914@autoatlanta.com |
Jan 16 2020, 05:25 PM
Post
#2
|
|
914 Guru Group: Members Posts: 7,810 Joined: 3-January 07 From: atlanta georgia Member No.: 7,418 Region Association: None |
lube the pin, support the coupler in a vice with wood to cushion and drive out the pin, Replace the coupler bushings with the special delrin variety with the completely round hole
|
|
|
|
| BeatNavy |
Jan 16 2020, 06:05 PM
Post
#3
|
|
Certified Professional Scapegoat Group: Members Posts: 2,924 Joined: 26-February 14 From: Easton, MD Member No.: 17,042 Region Association: MidAtlantic Region |
That was one of the more frustrating tasks I've had to do. Getting the pin out was surprisingly difficult. I think I ended up putting it in a vice with a drift and using the floor jack handle as leverage on the vice handle. Penetrating oil, heat, and crank a little on the vice. Lil' bugger finally let go.
My bushing disintegrated at VA state safety inspection when the guy at the garage couldn't figure out how to get into 1st gear and ended up man-handling it. I've got the brass one now. Good luck, Phil. |
 |
|
| mepstein |
Jan 16 2020, 06:14 PM
Post
#4
|
|
914-6 GT in waiting Group: Members Posts: 19,220 Joined: 19-September 09 From: Landenberg, PA/Wilmington, DE Member No.: 10,825 Region Association: MidAtlantic Region |
You will never regret getting a press. It’s one of those things you didn’t know you needed until you have one.
|
|
|
|
| BeatNavy |
Jan 16 2020, 06:34 PM
Post
#5
|
|
Certified Professional Scapegoat Group: Members Posts: 2,924 Joined: 26-February 14 From: Easton, MD Member No.: 17,042 Region Association: MidAtlantic Region |
QUOTE(mepstein @ Jan 16 2020, 07:14 PM)  You will never regret getting a press. It’s one of those things you didn’t know you needed until you have one. (IMG:style_emoticons/default/agree.gif) This effort may have been what convinced me to finally get one. |
|
|
|
| Chris914n6 |
Jan 16 2020, 06:36 PM
Post
#6
|
|
Jackstands are my life. Group: Members Posts: 3,302 Joined: 14-March 03 From: Las Vegas, NV Member No.: 431 Region Association: Southwest Region |
2. Normal
The coupler is not that strong. It's better to support the rod. I like to use a long socket under the pin - basically hammer or press the pin into the socket. |
|
|
|
| poorsche914 |
Jan 16 2020, 09:12 PM
Post
#7
|
|
T4 Supercharged Group: Members Posts: 3,087 Joined: 28-May 09 From: Smoky Mountains Member No.: 10,419 Region Association: South East States |
QUOTE(Chris914n6 @ Jan 16 2020, 07:36 PM) 2. Normal The coupler is not that strong. It's better to support the rod. I like to use a long socket under the pin - basically hammer or press the pin into the socket. (IMG:style_emoticons/default/agree.gif) |
|
|
|
| DRPHIL914 |
Jan 16 2020, 09:19 PM
Post
#8
|
|
Dr. Phil Group: Members Posts: 5,758 Joined: 9-December 09 From: Bluffton, SC Member No.: 11,106 Region Association: South East States |
QUOTE(poorsche914 @ Jan 16 2020, 10:12 PM) QUOTE(Chris914n6 @ Jan 16 2020, 07:36 PM) 2. Normal The coupler is not that strong. It's better to support the rod. I like to use a long socket under the pin - basically hammer or press the pin into the socket. (IMG:style_emoticons/default/agree.gif) I was just thinking that’s what I would do. I do see that George at AA and Sierra Madre have new couplers if I damage mine but let’s try not to do that- AND you guys are right, on my other thread I posted the demise of the coupler bushing, someone noted the firewall bushing looked like there was some space and indeed there is some play so I called Rick earlier in the week and have brand new one of his firewall bushings. I know Chris Foley makes great stuff but for now I am staying closer to stock. If I were autox this car I would do his whole system, but for now I think this will all be fine. |
|
|
|
| jmitro |
Jan 16 2020, 10:27 PM
Post
#9
|
|
Senior Member Group: Members Posts: 713 Joined: 23-July 15 From: Oklahoma Member No.: 18,986 Region Association: None |
QUOTE(mepstein @ Jan 16 2020, 06:14 PM) You will never regret getting a press. It’s one of those things you didn’t know you needed until you have one. +1! |
|
|
|
| IronHillRestorations |
Jan 16 2020, 11:04 PM
Post
#10
|
|
I. I. R. C. Group: Members Posts: 6,713 Joined: 18-March 03 From: West TN Member No.: 439 Region Association: None |
I've done a bunch of those. I use two sockets, one for a "cup" and the other for a pin. Make sure the pin isn't pitted badly or it can chew on the bushing.
|
|
|
|
| anderssj |
Jan 17 2020, 08:53 AM
Post
#11
|
|
Dog is my copilot... Group: Members Posts: 1,648 Joined: 28-January 03 From: VA Member No.: 207 Region Association: MidAtlantic Region |
Dr. Phil,
A couple of links I found helpful: http://www.914world.com/bbs2/index.php?sho...56765&st=20 https://www.youtube.com/watch?v=C0I5HOBvQbg I used the vise and socket method.... |
|
|
|
| rhodyguy |
Jan 18 2020, 11:32 AM
Post
#12
|
|
Chimp Sanctuary NW. Check it out. Group: Members Posts: 22,054 Joined: 2-March 03 From: Orion's Bell. The BELL! Member No.: 378 Region Association: Galt's Gulch |
From the pictures the pin ends look pretty distorted. That won't make the task any easier.
|
|
|
|
| IronHillRestorations |
Jan 18 2020, 12:14 PM
Post
#13
|
|
I. I. R. C. Group: Members Posts: 6,713 Joined: 18-March 03 From: West TN Member No.: 439 Region Association: None |
QUOTE(rhodyguy @ Jan 18 2020, 09:32 AM) From the pictures the pin ends look pretty distorted. That won't make the task any easier. Good point. So you want to make sure the pin doesn't have any burrs on it that would give you trouble pressing it through. If both sides have boogers, you can get by cleaning off the press through side. |
|
|
|
| DRPHIL914 |
Jan 18 2020, 03:21 PM
Post
#14
|
|
Dr. Phil Group: Members Posts: 5,758 Joined: 9-December 09 From: Bluffton, SC Member No.: 11,106 Region Association: South East States |
QUOTE(IronHillRestorations @ Jan 18 2020, 01:14 PM) QUOTE(rhodyguy @ Jan 18 2020, 09:32 AM) From the pictures the pin ends look pretty distorted. That won't make the task any easier. Good point. So you want to make sure the pin doesn't have any burrs on it that would give you trouble pressing it through. If both sides have boogers, you can get by cleaning off the press through side. Only one side is like that, so should be able to press it thru on other side. I don’t think the pins are available. There are several different couplers on line, not sure any but the OEM one from Sierra Madre is the correct length etc. |
|
|
|
| DRPHIL914 |
Jan 18 2020, 03:26 PM
Post
#15
|
|
Dr. Phil Group: Members Posts: 5,758 Joined: 9-December 09 From: Bluffton, SC Member No.: 11,106 Region Association: South East States |
https://sierramadrecollection.com/Shift-Cou...-88-p22232.html
Any reason why these could not be used, looks like comes with coupler bushing and pin Attached thumbnail(s) 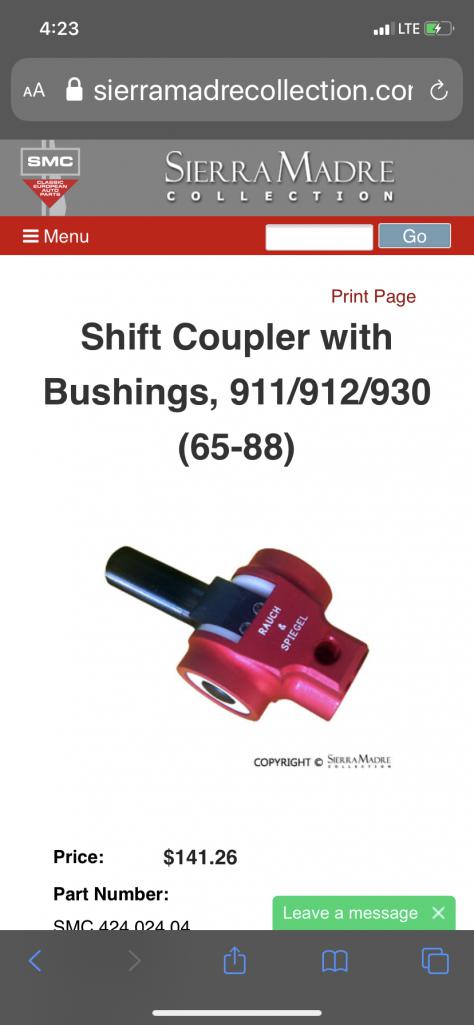 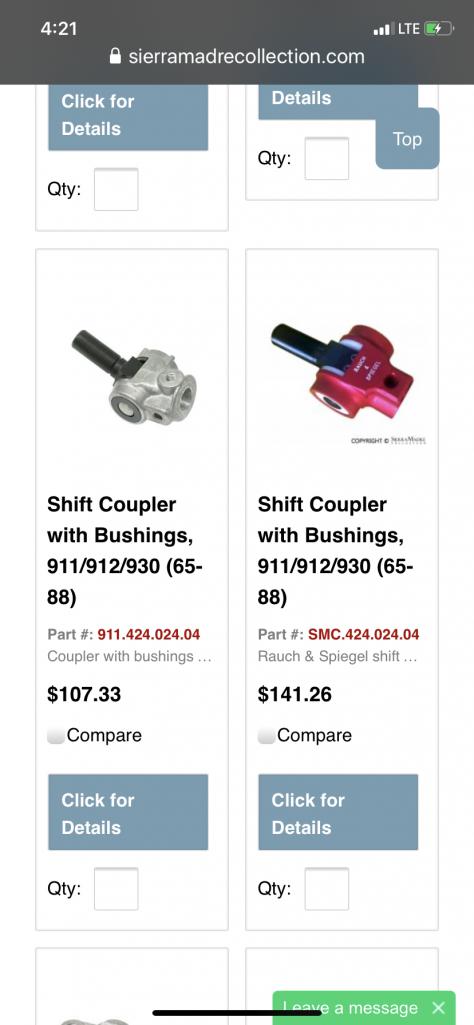
|
|
|
|
| Mikey914 |
Jan 18 2020, 04:19 PM
Post
#16
|
|
The rubber man Group: Members Posts: 12,638 Joined: 27-December 04 From: Hillsboro, OR Member No.: 3,348 Region Association: None |
Why replace a perfectly good part ?
You still have to press the shaft out of the old assembly. We had looked at making these but got down to that question. Perhaps we make an entire assembly? Easy swap out. |
|
|
|
| Mark Henry |
Jan 18 2020, 07:29 PM
Post
#17
|
|
that's what I do! Group: Members Posts: 20,065 Joined: 27-December 02 From: Port Hope, Ontario Member No.: 26 Region Association: Canada |
Six inch vice, the two socket method....and that would be my go to even though I do have a press.
|
|
|
|
| rhodyguy |
Jan 18 2020, 08:59 PM
Post
#18
|
|
Chimp Sanctuary NW. Check it out. Group: Members Posts: 22,054 Joined: 2-March 03 From: Orion's Bell. The BELL! Member No.: 378 Region Association: Galt's Gulch |
1/2 step forward and 4 steps backwards with those fancy ones. Cutting, welding?, tapping?, ruining a functional rod? Dress the pin with a file, put in the new bushings and be done with it. Put glycerin on the pin and bushings.
|
|
|
|
| mlindner |
Jan 19 2020, 06:26 AM
Post
#19
|
|
Senior Member Group: Members Posts: 1,509 Joined: 11-November 11 From: Merrimac, WI Member No.: 13,770 Region Association: Upper MidWest |
DrPhil, if all fails, I do have a nice one for sale $75.00. Mark
 |
|
|
|
| Tdskip |
Jan 19 2020, 07:57 AM
Post
#20
|
|
Advanced Member Group: Members Posts: 3,678 Joined: 1-December 17 From: soCal Member No.: 21,666 Region Association: None |
Personally I’d replace it since if the repairs are not spot on it tweak the alignment of everything.
Not that expensive... |
|
|
|
|
1 User(s) are reading this topic (1 Guests and 0 Anonymous Users)
0 Members:

|
Lo-Fi Version | Time is now: 19th April 2024 - 07:10 AM |
Invision Power Board
v9.1.4 © 2024 IPS, Inc.